

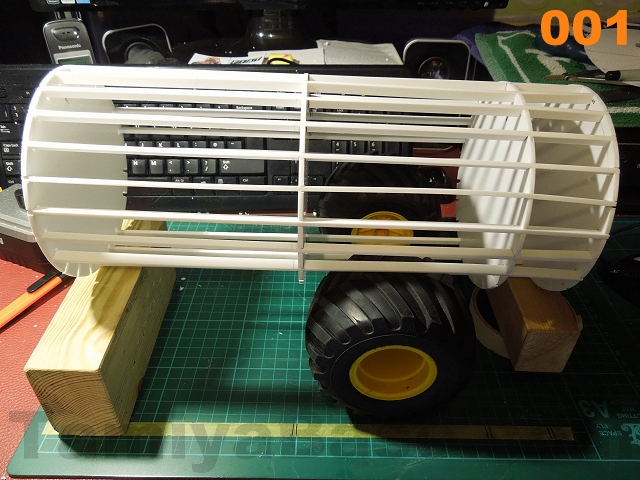
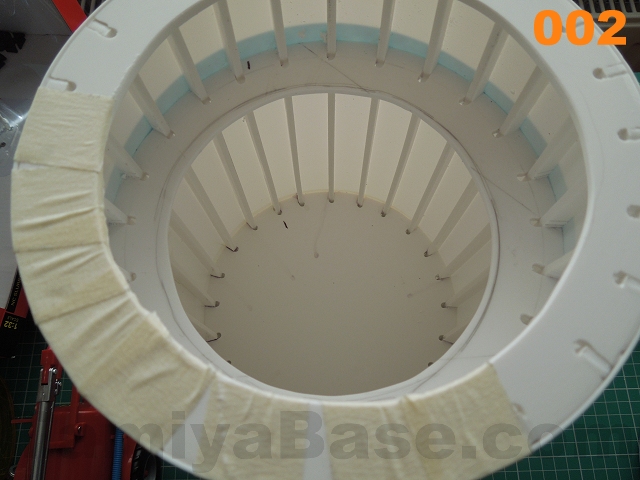
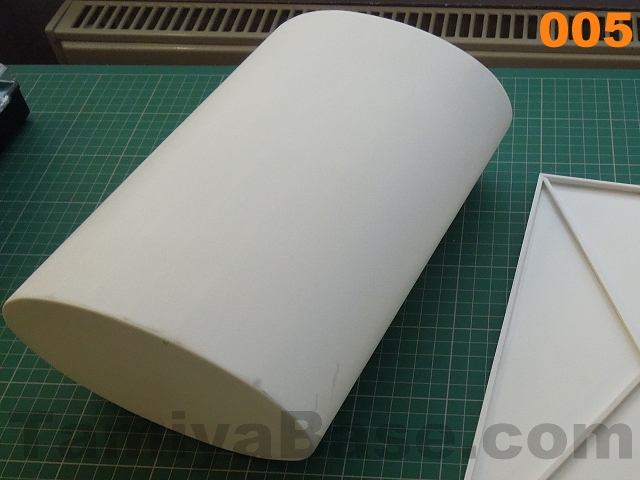
In a slight change of plan, this instalment will cover making large, two-dimensional curved structures from styrene sheet. The technique is lifted straight from building RC boats & planes from balsa, where a combination of bulkheads and stringers provide an internal structure to form the external skin of tissue or thing plywood around.
It's a technique I've used to make scale storage/transport tanks, but it can also come in handy for making curved sections in other builds.
In the examples below you can see a tank that's basically round structure (made up of round bulkheads notched to take stringers), an oval tank (fundamentally the same process, but starting with ellipsoid bulkheads), and an RV with a curved overhanging bunk section (flat sides & internal stringers) - see images 1 to 9.
 |
 |
 |
 |
 |
 |
 |
 |
 |
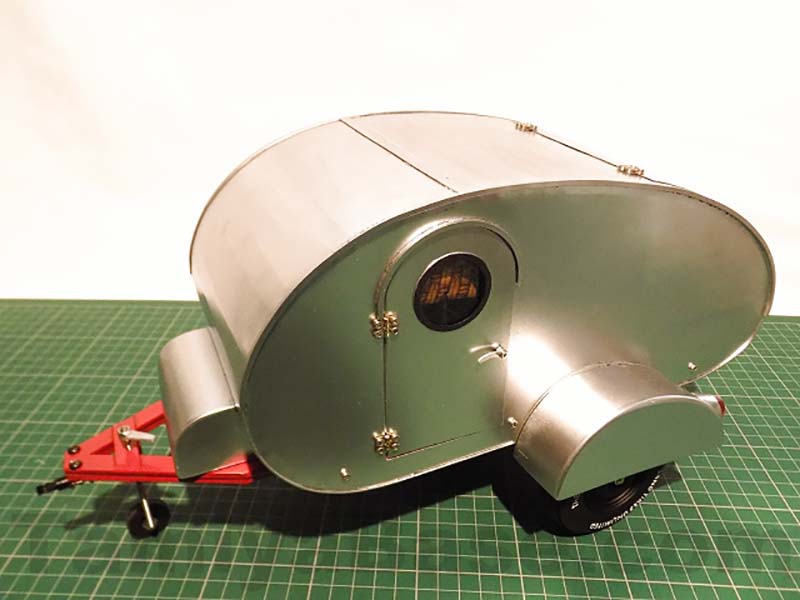
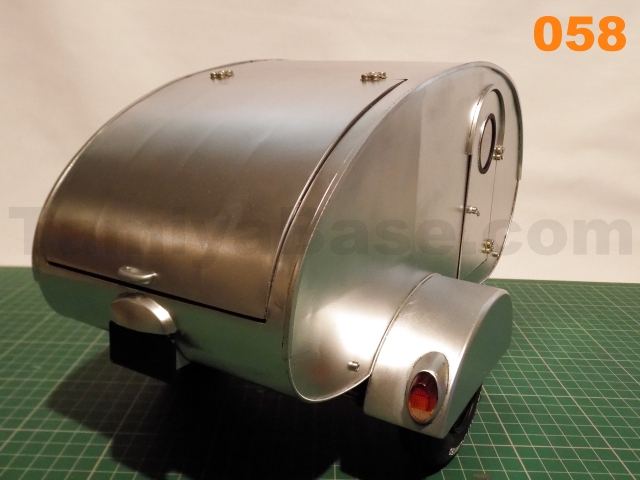
Now, I could just leave it there, but it would be nice to have a worked example to follow on from the previous instalments - so a 1:10ish scale "Teardrop" caravan seems like a good idea.
I don't propose to detail all the measurements and include all the parts in the plans this time - if you've got this far building along at home then you know as much as I do & shouldn't need any hand-holding ;)
First appearing in the 1930s, teardrop caravans (aka trailers in the USA, or campers in Australia?) were small, with space to sleep two adults (+sometimes two small kids), with some sort of kitchen facility and/or storage space in the back, and their shape picked up on the streamlined look of the period.
There are more variations of the format than you can shake a stick at, I've borrowed heavily from the "Campster 12" design for the basic profile - then resized to 1:A4 sheet "scale", which fortuitously also makes sense in terms of what a 1:10 driver figure would look like, fully stretched out..
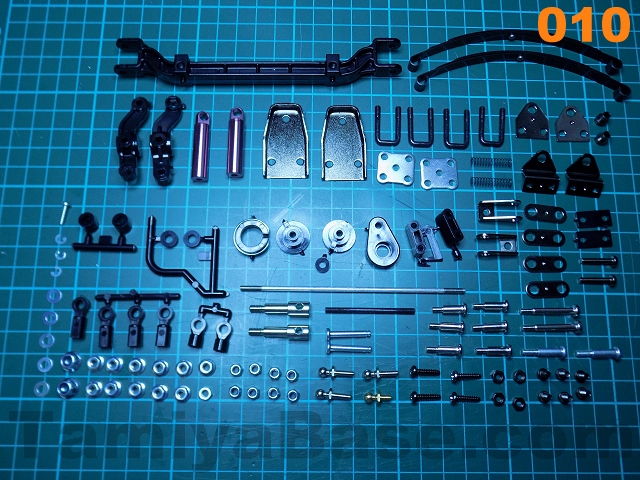
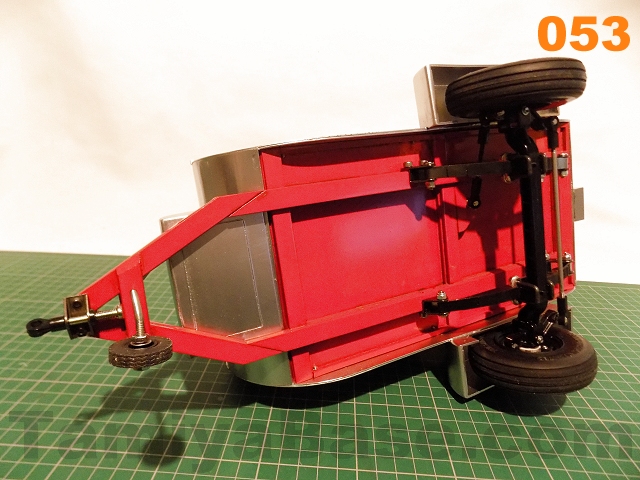
The first thing to think about is an axle, plus wheels and (possibly) suspension. In the past I've built trailers with a simple M4 studding (allthread) and tube to suit, plus leaf springs, however there are many scale trailers out there with no suspension at all.
This time, it made sense to me to use a Tamiya 1:14 scale truck front axle "kit". These are not an official Tamiya set, but instead are taken from kits by a number of eBay sellers. Exact spec will vary, but the set I got from "catmand11r" for 34.99 GBP included all the bits I needed (minus a few screws) for the axle, suspension and tow hitch.
I could list all the part numbers, but it's really not a cost effective way of buying. At the time of writing (March 2016) it would set you back something like 160 EUR (125 GBP) to buy the all the required sprues/frames and parts bags individually.
If you use some other arrangement of axle, the chassis part of the build will probably need modification.
A pair of wheels are obviously needed - and given all the requirements (visual size, ground clearance, minimising intrusion beyond the chassis floor, etc), Sand Scorcher (and a lot of other cars) fronts seem like a good option, so we can add four 1150 Bearings to the shopping list, along with a pair of Sand Scorcher/Grasshopper type front wheels (part # 555066) and front tyres (# 9805033) along with ten 2mm Nuts and 2mm x 8mm Screws (the Grasshopper Screw Bag A, part # 19465653 is a reasonable way of getting those).
I did look into Rough Rider/Buggy Champ fronts, but while the wheels are good value, the tyres really aren't.
Building the Axle
I built the axle mostly as pictured in the Tamiya King Hauler manual, bit with a few exceptions - the spacer between the shackles on the rear end I turned down by 1mm (so final dimensions are 7.4mm OD/ 4mm ID/6mm wide) to fit an extra bracket with the aid of the longer 3mm step screws, and at the front end fitted the stays backwards. I also later inverted the U-bolt and plate arrangement.
 |
 |
Downloads
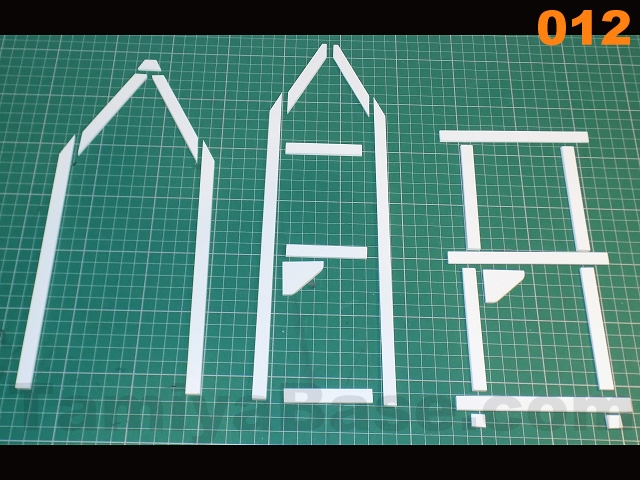
Building the Chassis
Assuming you do want to follow along at home, templates 1 to 3 are for the basic chassis frame, two of them need cutting and joining at the yellow line as they wouldn't fit on a sheet of A4 without trimming. You could make each layer out of one piece of 3mm styrene, but that would be tedious & wasteful: I'd suggest cutting a number of long 10mm wide strips to start. Each template shows red dotted lines where I cut the strips, so refer to those for dimensions & angles.
I started with the middle layer (template 1), gluing the joints & reinforcing with the bottom later (template 2), then moved on to the top layer (template 3). It's safe to drill the rear spring mount and steering rod stop* holes as marked on the templates, but note that the front mount pairs need the points transferring to the sides before drilling**.
Note*: This arrangement produces some quite bad bump steer, so an alternative might be in order ... then again, it does make it unmistakeably Tamiya ;)
Note**: I made quite a bish of keeping the drill straight here, as you may see in some of the photos.
Chassis parts from left to right: template 2 (bottom layer), template 1 (middle layer) and template 3 (top layer):
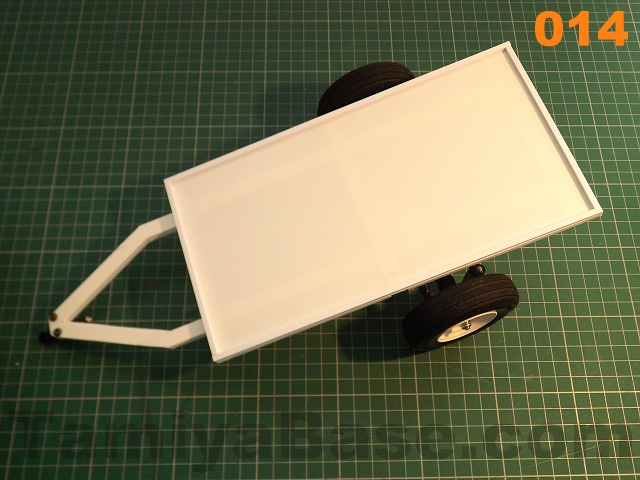
Making the Tow Hitch
I wanted to use as many parts as possible left over from the front axle "kit", so a shock shaft, spring & lower eye, along with an inverted V shape bracket and two 3mmx10mm screws from the spares box make up the trailer side of the hitch.
For the truck side, another bracket & long(er) 3mm step screw have been pressed into service, along with two spare 3mm x 14mm screws, washers and a body clip).
It's not 100% perfect, but does give a bit of shock absorption & up/down deflection - and lots of sideways & rotational movement.
Note: there is a chance that access and deflection may be compromised by the spare wheel cover later on, but if so the tow hitch on the Laplander can be spaced out & dropped down a little, and the hitch on the caravan flipped over on to the top side of the chassis.

Post script: in the end there were issues, solved by lifting the spare wheel, and using a longer screw - specifically a Grasshopper front shock shaft.
Floor
This is a simple 236mm x 125mm panel cut from 1mm sheet glued on the top, with 3.2mm square strip fixed on the edges, both top and underside.
 |
 |
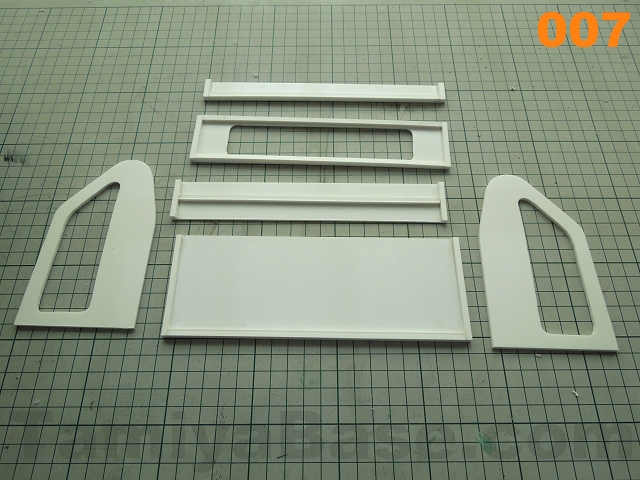
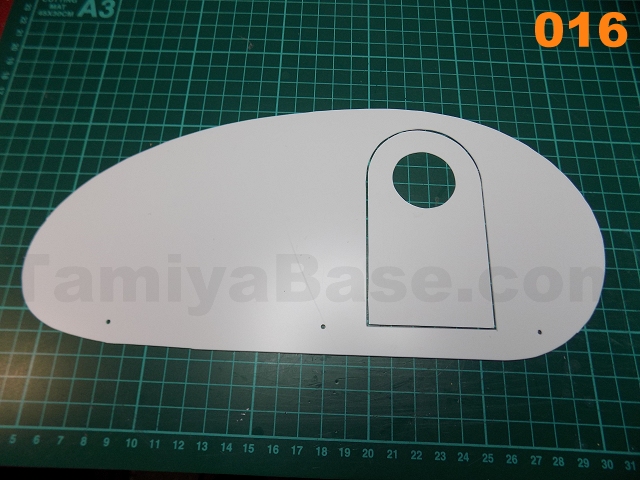
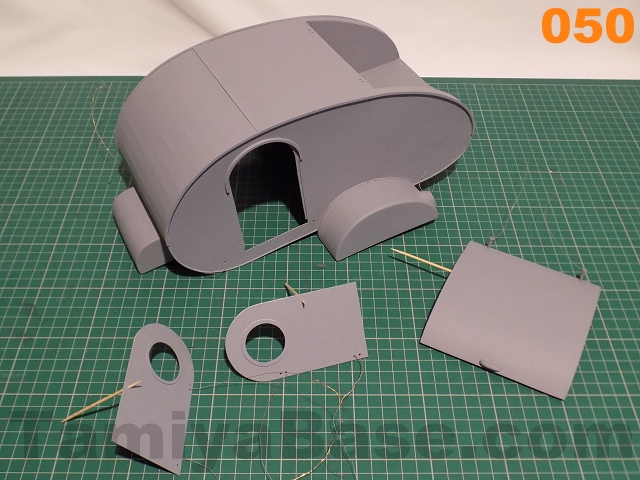
Side Panels
Print out two copies of the template, temporarily stick to 0.75mm sheet & cut out to the perimeter line. Cut out both sides of the door line to simulate the door aperture, if necessary use a Dremel & large sanding drum/ sand with set & dry to get the shape correct.
Note the dotted line on the side template - this should line up with the top of the uppermost strip of 3.2mm square on the chassis. Draw another line 4mm below this & mark points along it approx. 20mm forward of the door, 5mm aft of it (note - shown further back in the earlier photos) & a third 30mm forward of the back end, then drill 2mm holes.
Line the side panels up using the dotted line & noting that the front & rear corners of the chassis should be just hidden, then drill 1.5mm holes. Use very short M2 screws to hold each side on - and take care not to glue the sides to the chassis at any point during the rest of the build.
There are additional shapes on the template for "glass" (e.g. thin lexan), inner window seal (e.g. self adhesive vinyl) outer window seal and door jamb (thin styrene). You can either glue the door to the jamb for simplicity, or add hinges & some sort of latch arrangement for easy access to the interior/realism.
Remember to make the sides left and right handed.
 |
 |
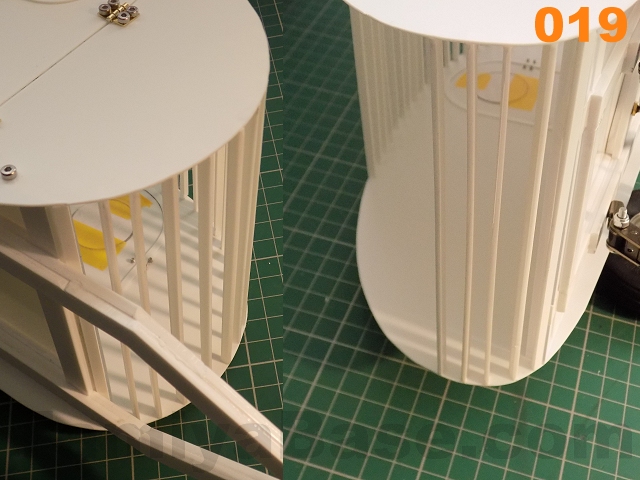
Ribs (or Stringers?)
Cut a bunch of 125mm x 4mm strips of 1.5mm sheet (I used 33 initially, although you could probably use a few less) & glue them between the side panels.
Leave a gap at the rear for the kitchen access panel - I'd suggest a space from approximately 9 o' clock to approx. 11 o' clock looking at the outside of the right side panel.
Use a couple of styrene offcuts to make templates of the open area - these will come in handy later.
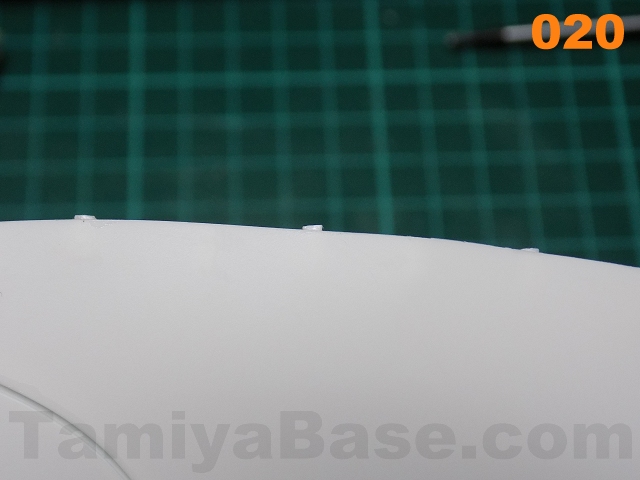
Check that the ribs don't protrude beyond the side panels (see image 20) - if they do, sand back until they're all flush.
 |
 |
 |
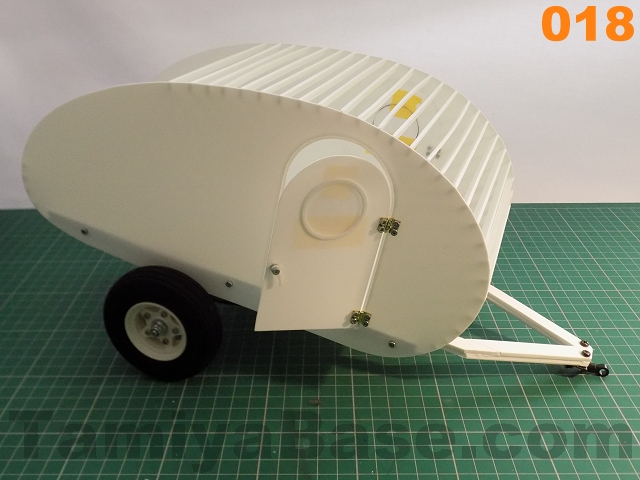
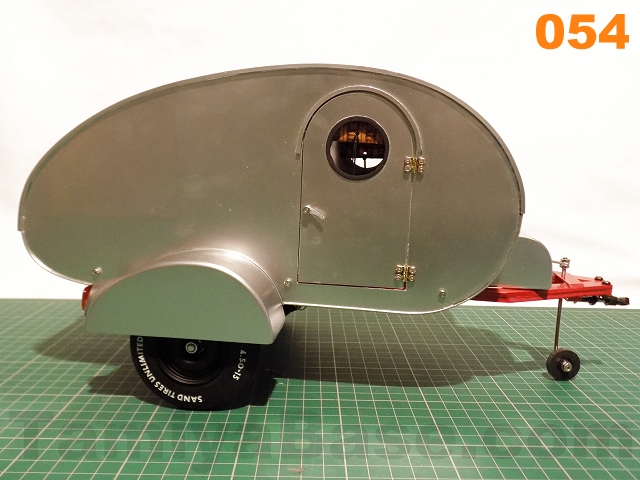
Skinning
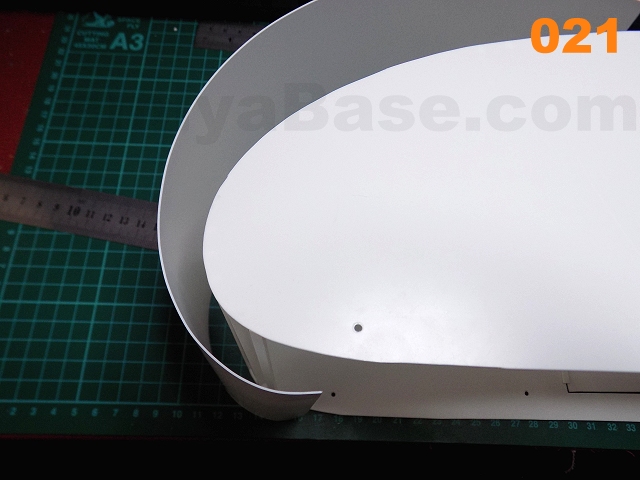
A3+ sheets aren't big enough to cover the outside in one go, so cut two sections across a 0.5mm sheet (or lengthwise on A4 sheets), the same width as the caravan body - nominally 125mm + 0.75mm + 0.75mm = 126.5mm, but I allowed a bit extra & cut/sanded back later.
Form the cut bits around a pen or something similar to give a head start on the curves, and begin gluing to the side panels & formers a little at a time, using tape to hold the skin in place until you get to that part. I started at the back and worked forward, cutting the panel just above the door. The second panel started there & worked forward.
Having just the one layer of very thin sheet can result in a "starved dog" look - i.e. one where you can see the ribs. This tends not to be apparent immediately, usually appearing after a few days when the plastic has fully hardened & shrunk back. In this case, I wanted the final look to give the impression of old metal, but if you want to avoid it (look at the orange & red examples earlier), just put another layer the same thickness on the outside. As you can only really glue the second layer on at the edges, that layer is mostly free floating and any unevenness tends not to show through.
Using such thin sheets there was some inevitably a bit of wobbliness to the edges so I used 2mm square strip to make gutters - again it helps to pre-bend these. I added semi circular gutters above the doors while I was at it.
 |
 |
 |
Note: the bottom edges of the side panels looked a bit unfinished, so much later on in the process (after the wheel spats) I glued on a little fine edging strip.
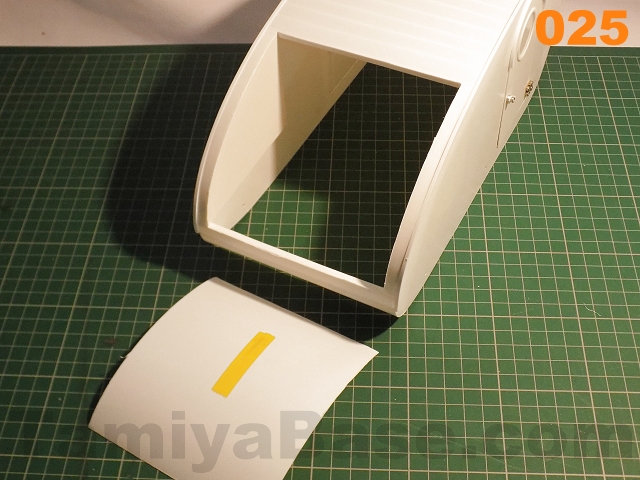
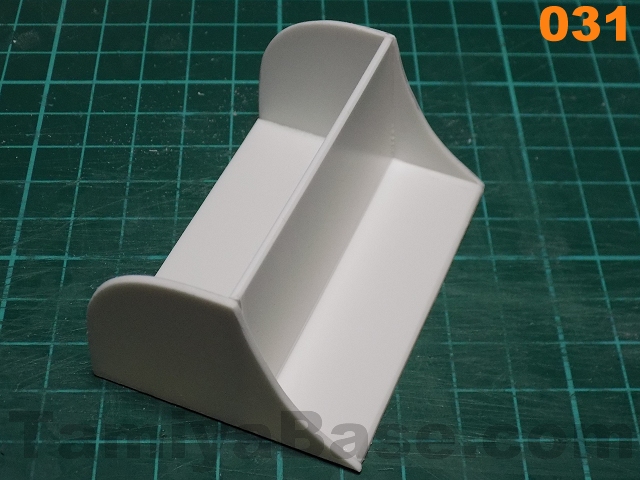
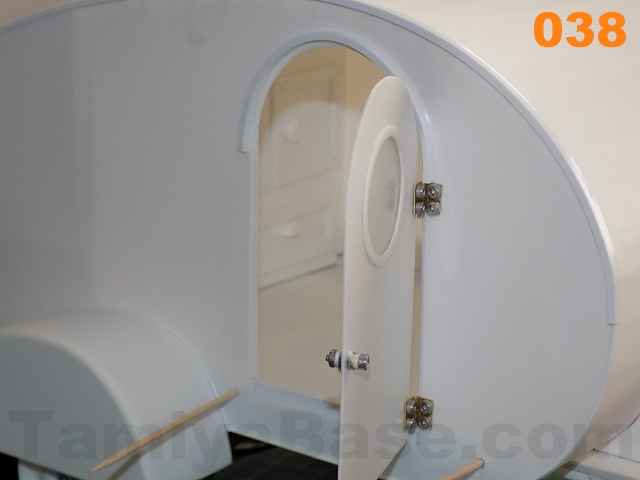
Rear Hatch
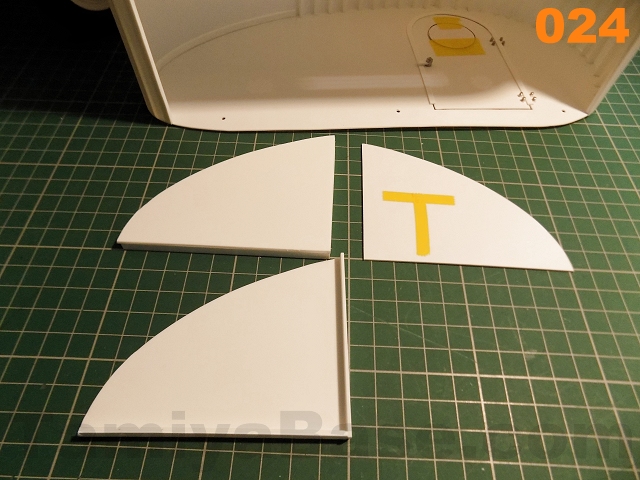
Use the profile template you made earlier to make two duplicates to act as the hatch area sides (image 24), then cut some 5mm wide strips to act as spacers - fit suitable lengths inside the roof & add other to the straight parts of the panels. Glue the sub assemblies in, then once set, carefully cut out the remaining free area (image 25). Mark the outside so you can maintain the orientation as the aperture is unlikely to be perfectly square.
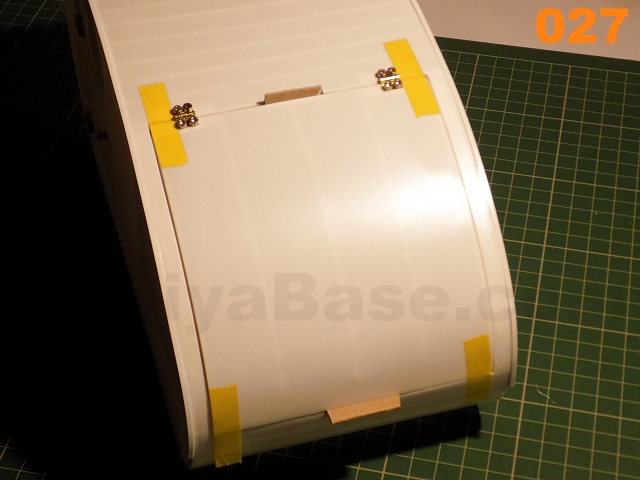
Add 5mm strips of 1.5mm sheet to the top & bottom of the inside of the door, then, using the form template made earlier, make & fit a number (I made 5 in total) of curved stringers to make the outer skin curved.
Using card or other suitable spacers (see image 27), fit the hatch back in the aperture & with the alignment & spacing correct, fit hinges.
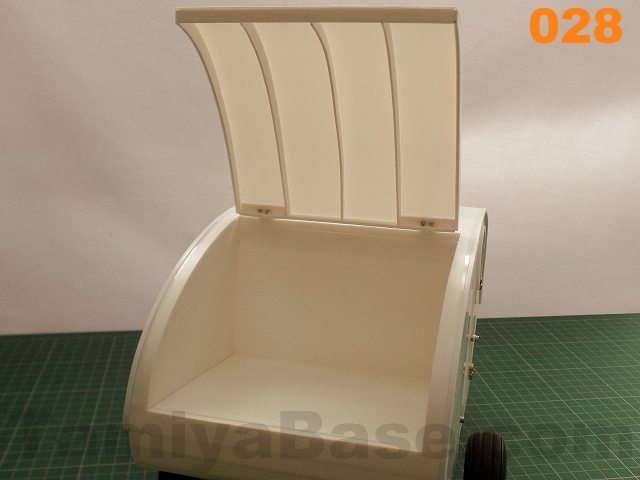
Box in the kitchen area, then you can skin the inside of the caravan to hide the internal ribs. I also covered the inside of the hatch and the ribs on the tail end, though it's not strictly necessary there.
 |
 |
 |
 |
 |
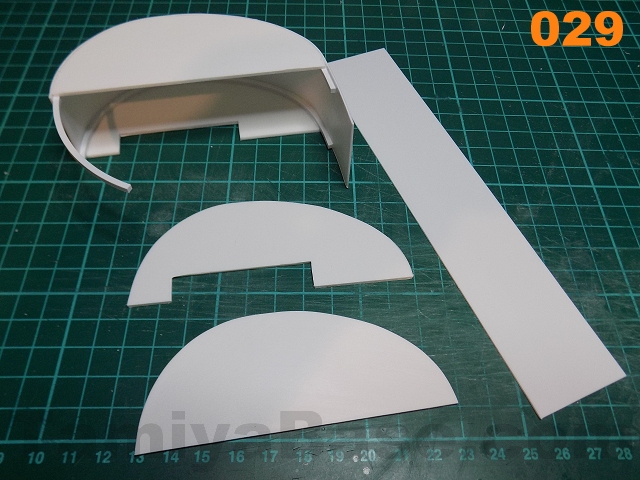
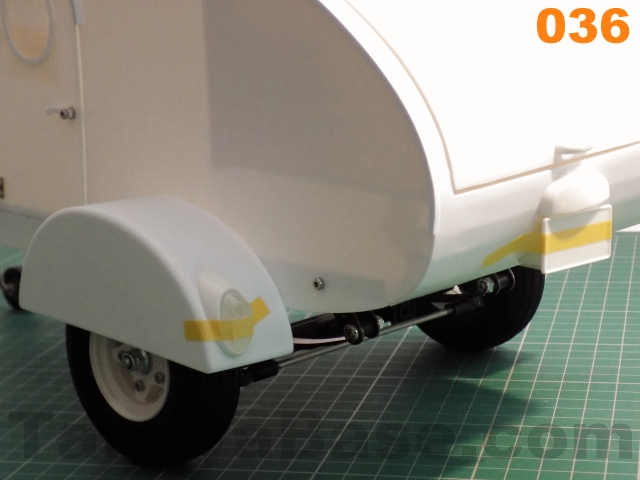
Spats (Wheel arches/Fenders)
After a bit of experimentation, I found a whee larch shape consisting of part of an 80mm circle at the front with a partial 120mm ellipse at the rear gave me the sort of pre- wind tunnel era "streamlining" I was looking for (see template 2). The two inner parts need a 10mm high x 50mm wide notch cutting out of the middle, the outer can remain plain. Each former is joined by a 35mm wide strip of 0.75mm sheet.
Note: make sure you make one left & one right handed part.
As the wheel arches will be the widest part of the caravan, they're theoretically vulnerable to knocks, so I braced the insides with 2.5mm square strip (see image 29). Fill the edges & sand back, putting a little curve on the outside edge.
Line the centre of the spat up with the wheel centre & the notch with the bottom of the side panel before gluing on.
 |
 |
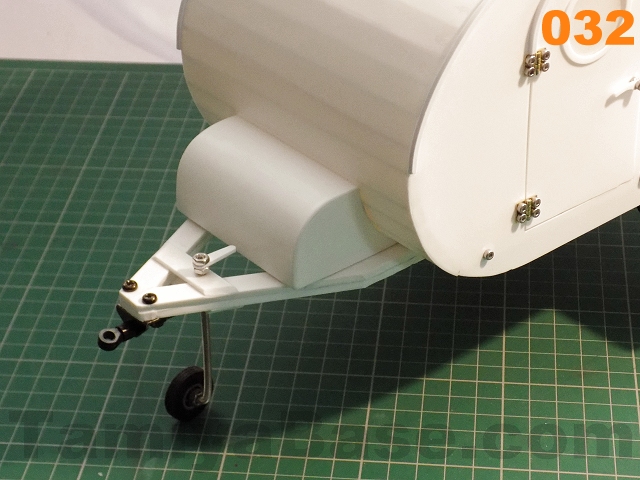
Gas Bottle Cover & Jockey Wheel
At the front of many caravans you'll see a tool chest and/or gas bottles, I wanted to keep the streamlined look & so made a curved boxed instead. The rear profile matches the front of the caravan, while the front is approximately the same radius as that of the door windows.
The box is made up of a 1.5mm base and internal support, 0.5mm sheet on the hidden curve, and 0.75mm on the visible curve. After filling & sanding this was glued on the front of the body, but NOT to the chassis frame.
For the jockey wheel, I used a "Tekno" brand 1:50 scale truck wheel & tyre, these used to be plentiful and cheap on eBay, but now, not so much. You could also try also looking for a small RC plane tail wheel. I also used bent a length of M3 studding (stainless M3 studding seems to take bend better than bright Zinc plated steel, which generally just snaps) so the jockey wheel can be raised & lowered, fixed to the chassis by 10mm wide strips of 3mm & 1.5mm sheet, drilled off-centre to 2.5mm & tapped appropriately.
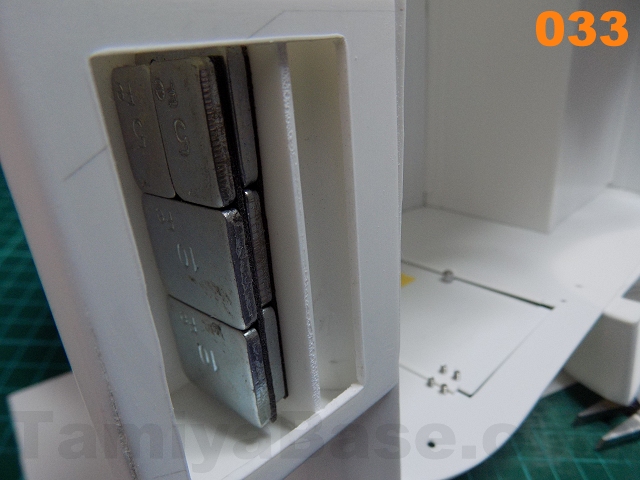
Note: It's well worth putting a bit of weight in the box to counter the tendency the caravan has to balance on its wheels and tail end 60g+ (just over 2oz) of stick on steel weights should do the trick, penny washers or modelling clay would do too. It's better to do this during the build rather than after, like I did - I had to cut out a section of the cover base & cover it back up later.
 |
 |
 |
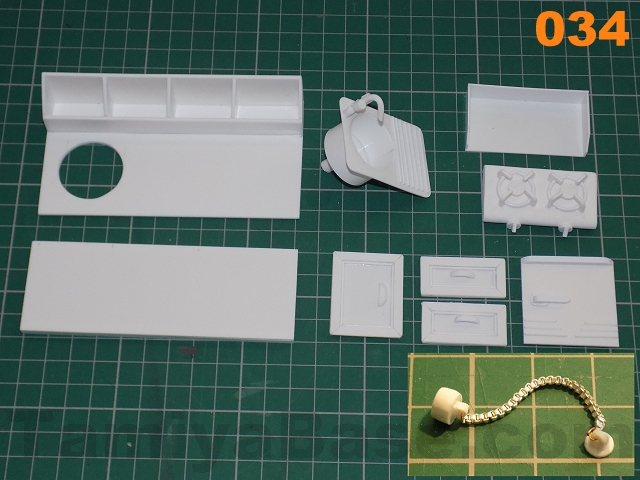
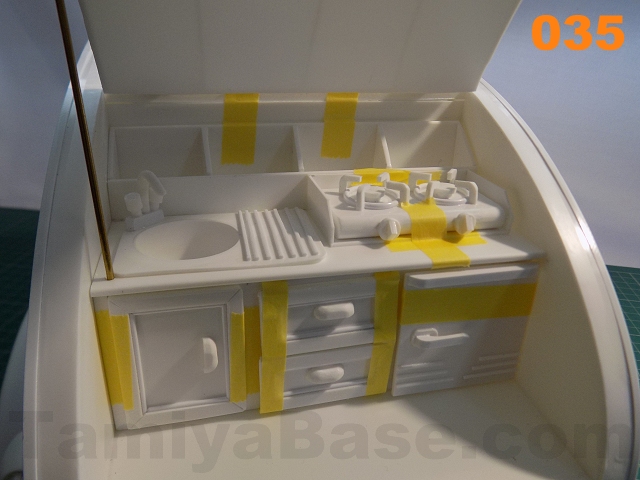
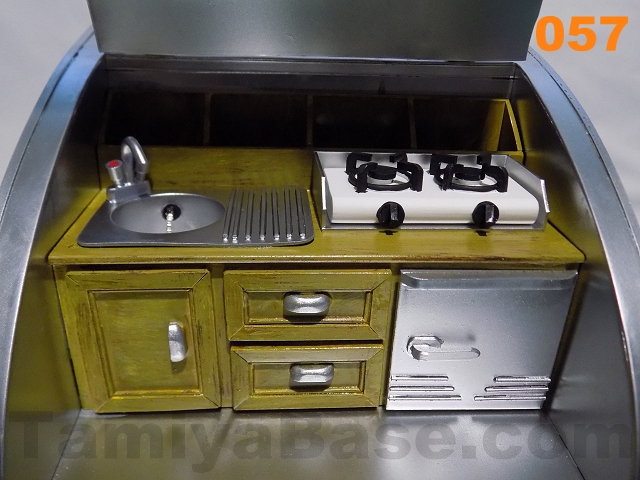
Fitting out the Kitchen
Take the back end profile template you made earlier, make a paper copy & plot on that the space taken up by the rear hatch bracing (and inner skin if appropriate). You'll see that there's not a lot of space left, so the kitchen needs careful planning if the hatch is still to close. Look at photos of 1:1 teardrop galleys for inspiration & to see what's realistic.
I made a 57mm deep shelf from 2mm sheet to fit 40mm up from the floor & fitted out the back third with cubbyholes made from 1.5mm sheet, also making a hole for a sink.
The sink itself is mostly 0.75mm sheet, as is the hob surround. The 2-burner hob is two layers of 3mm sheet with the edges rounded & details added.
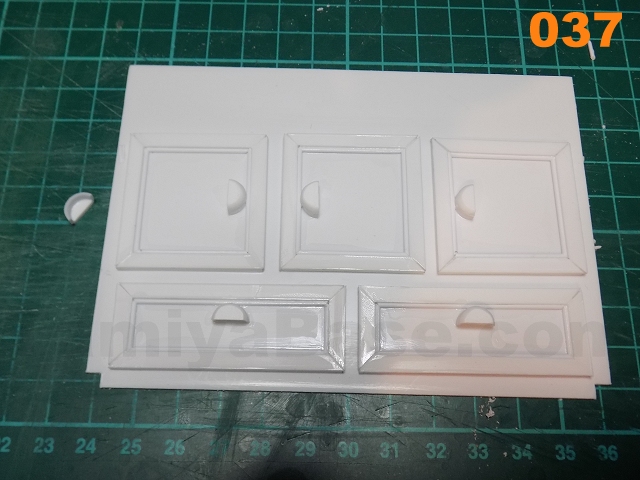
The fridge, cupboard and drawers are a complete fake, being a 40mm x 112mm panel (with 3.2mm square strips on the back to help it go in square) with layers of detail on the front.
 |
 |
Lights & Number Plate
There are lots of options here, the most appropriate (for replicating at 1:10 scale what's usual for modern UK roads anyway) would be a "trailer board" - a long rectangle with lights at each end (look to pt. 9 of this series for a method) & a license plate in the middle, fixed to the rear of the caravan.
I wanted something a bit older looking, and as I had the appropriate parts from a re-release Sand Scorcher going spare, used those instead. The oval rear light holders needed a lot of careful Dremelling to take out the opaque "lens" parts so I could use the clear parts instead, and a bit of reprofiling of the backs to match the wheel spats. The licence plate light holder also needed re-profiling, and the licence plate itself needed a curved mount constructing.
Note: Having glued the number plate on after painting, it got knocked off while still on the bench - it's probably better to plan to screw it on from the start.
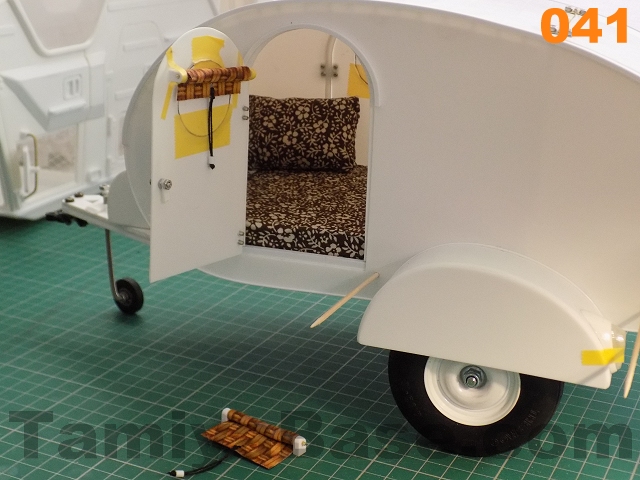
Interior Fit Out
Fake cupboard & drawer fronts were built in the same manner as those for the kitchen, with the exception that I cheated on the pulls, which were made with very short lengths of 9mm tube with 1.5mm sheet stuck on, carefully sanded to shape & cut in half. The support panel is 124mm x 90mm* with 4mm notches cut out on the bottom corners to clear the chassis (see image 37, plus test fitting in image 38).
* Note: it could/should have been 5mm taller, in hindsight.
The mattress is a 150mm x 118mm piece of 10mm thick foam, I cheated & just used suitable spray glue rather than sewing up a proper cover.
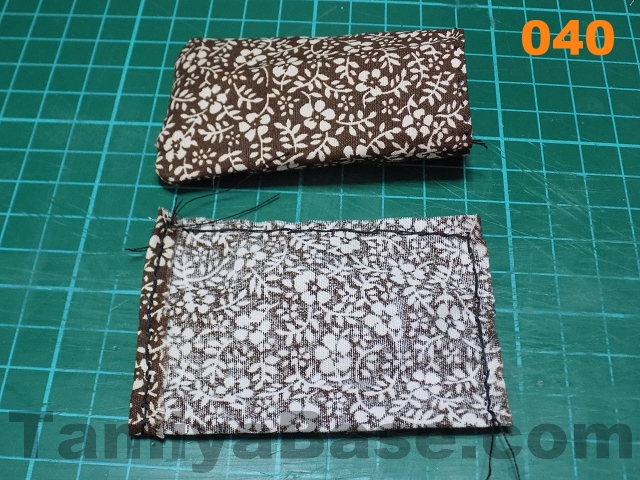
Pillows/cushions though did need a bit of needlework - for finished dimensions for each around 75mm x 50mm:
- Cut two pieces of suitable cloth to 85mm x 110mm;
- Fold one long side 5mm over (so the two "outsides" are visible, if you're using printed cloth) & hem (image 39);
- Fold in half (so both insides are outermost) & stitch 5mm in from the edges along both unsewn edges (image 40);
- Turn right way out, stuff with something appropriate (I used cotton wool) & close up the open end with a few stitches.
No sewing was needed for the blinds, I used spray glue to stick two layers of cloth together before cutting to size (c. 37mm x 50mm). Pull is a short length of glace cotton thread looped through a punched hole, passed through a 3mm length of .100" round rod drilled with a 1.5mm hole & knotted underneath. The cloth was wrapped around a 45mm length of 1.5mm brass rod, brackets were made from 3mm styrene sheet.
 |
 |
 |
 |
 |
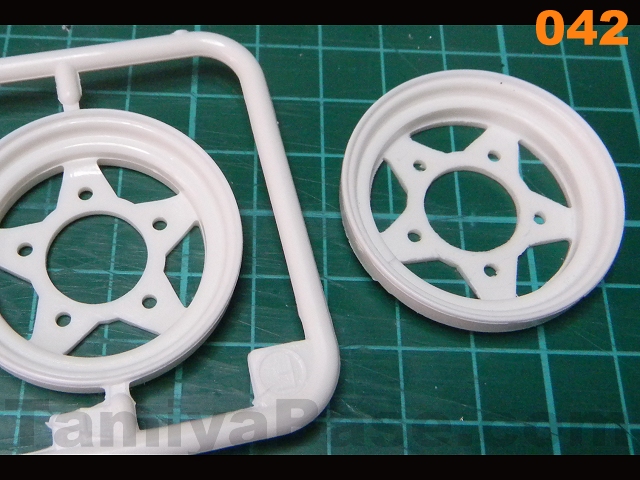
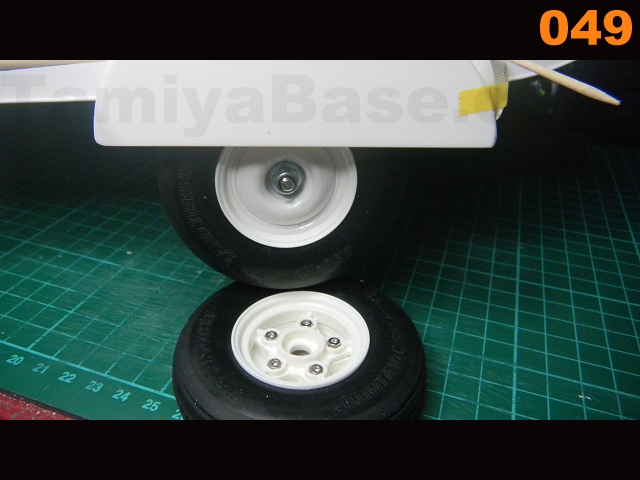
Wheel Modifications
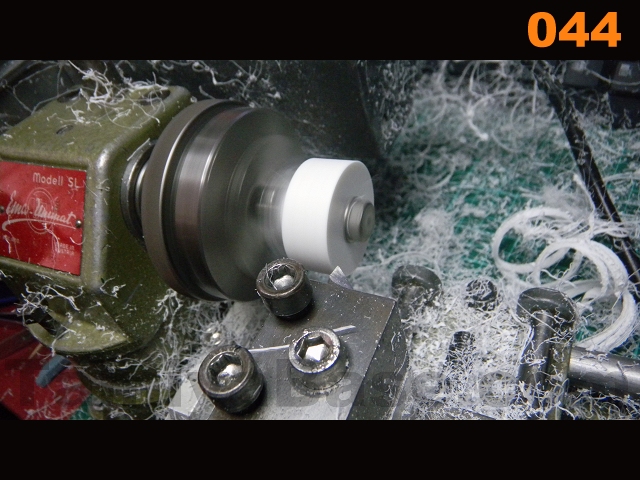
Original equipment for a trailer of this period would almost certainly have been pressed steel wheels, which are not something you can often find for RC vehicles. I modified a new set of Scorcher front wheels to look more appropriate, but to be honest I wouldn't want to try this without access to a compact lathe. My method was:
- face off outside of spokes (on outer wheel part) so they're flat (image 42);
- take outside bearing holder (on wheel centre) to same level, about 1mm off (image 43);
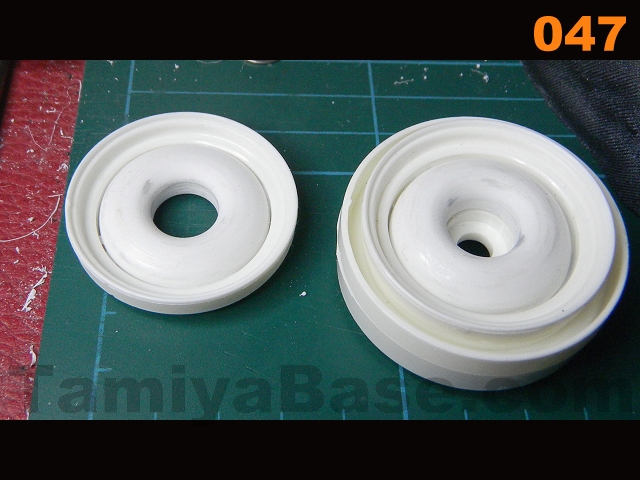
- make four 30.5mm OD discs from 3mm sheet (image 44);
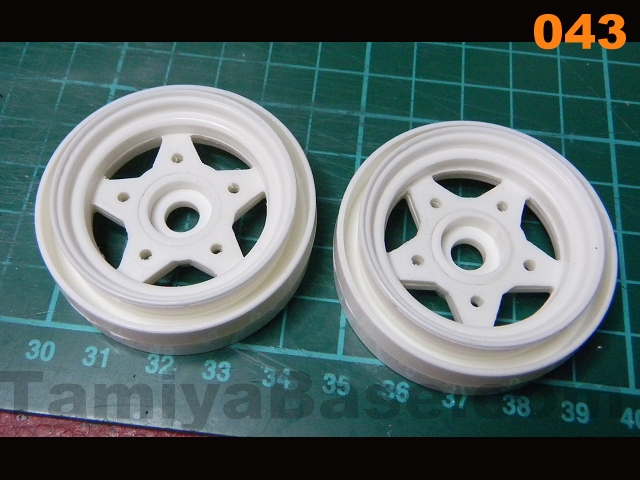
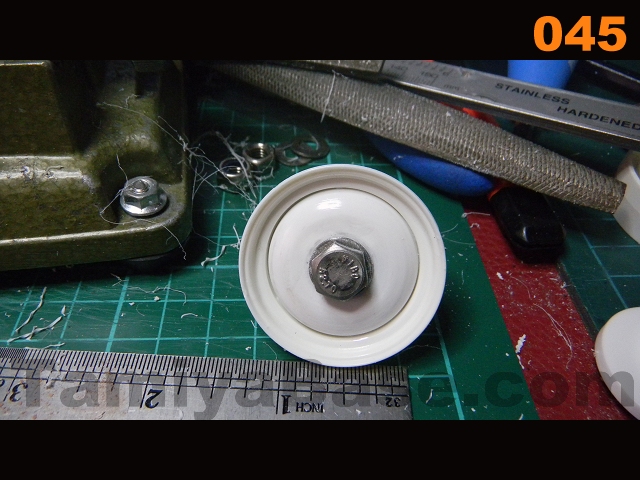
- glue in pairs & taper turn/file/sand outer edge of outer face to a rounder profile (image 45);
- counterbore centre to 11mm (image 46) & file/sand to round profile (image 46);
- glue the add-ons to the wheels & add filler strip (e.g. 1mm round rod) to gap (image 47);
- use fine masking tape to add a depth indicator to a 1.5mm drill bit (image 48), leaving 4.5mm exposed & drill shallow pilot holes through the existing wheel screw holes;
- use M2 x 8mm screws from the inside of the wheel to "invisibly" hold the three parts together (image 49).
 |
 |
 |
 |
 |
 |
 |
 |
Paint & Final Build
With the caravan dismantled as much as possible I sprayed the wheels, body & doors inside & out with grey primer, the chassis/floor section with red primer, and the rest of the styrene parts with white primer. The body, doors, fridge door, sink & burner surround were sprayed with a "chrome look" aerosol, and the wheels with satin black. The chassis was finished off with coats of Post Office van red.
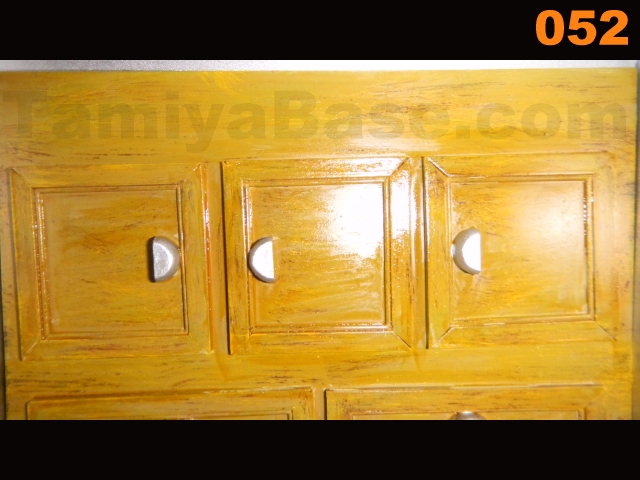
The "wood" sections were airbrushed with a light tan colour, then dry brushed with greys & browns before being given a light wash of the original tan colour. Final finish was two coats of clear yellow.
Rear lights were given several coats of clear red and clear orange in the relevant places.
 |
 |
 |
Most of the caravan is screwed together, with the mattress & pillows being fitted loose. The kitchen & cupboard sections, along with the blind supports were carefully glued in with cyanoacrylate (superglue). The lights and door windows were glued in with Pacer "Formula 560" canopy glue.
"Chrome" parts were given a very light wash with dilute black along the edges, the chassis had a heavier wash with dilute Hull Red.
 |
 |
 |
 |
 |
 |
Next Time
The only thing left outstanding from this series is the painting & final construction of the Laplander, I plan to cover that by way of an appendix.
________________________
Written by TB member Jonny Retro