TOPIC:
Sand Scorcher 2010 - How to build a dream 11 years 1 month ago #19723
|
Hello everybody
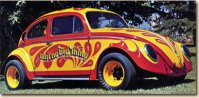
My first Tamyia experience dated back some 25 Years or so. I had a Mitsubishi Pajero (The Rally Paris Dakar One) wich was Good fun at least before the chassis broke into pieces. When i saw that Tamyia did a Re-Releses of the Sand Scorcher i decided that this was my turn for a revival! So in December 2012 i bought the Kit on Ebay. First i thought to build it out of the Box but when i saw that they had changed all the original Sponsor Decals into some nonsense Rubbish Label Stuff i altered my plans. I started looking for some inspiring Paint Jobs for the Beetle - and then i stumbled across this amazing Car... 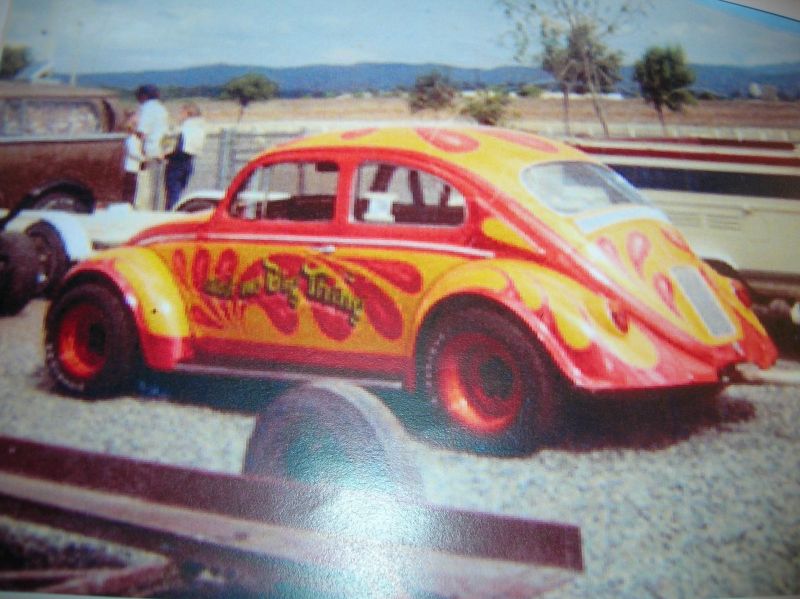
The Project First i thought: Come on, you must be kidding, this Design is way over the top to bring it down to scale Then on the other Hand i had been doing a lot of scale modelling in the past so most of the Painting equipment was still around, so something in me started seriously considering the options. And there really was something about this car: The wild color Scheme was tipical 70'ies in its appearance - but there was also something very toy-like to it with all the funny drips and splashes. The longer i thought about it the clearer it became that the car was really beggin for a replica. So i decided to give it a try. I knew i wanted to stay true to the original concept, but then it was also ovvious that the nose and the fenders required certain variaitons to match the Sand Scorchers different Proportions. The nose the Lining was logic and straight forward whilst for the fenders i went down the road of simplification. This is how cartoon figures work: pronounce the characteristics and reduce the numbers! 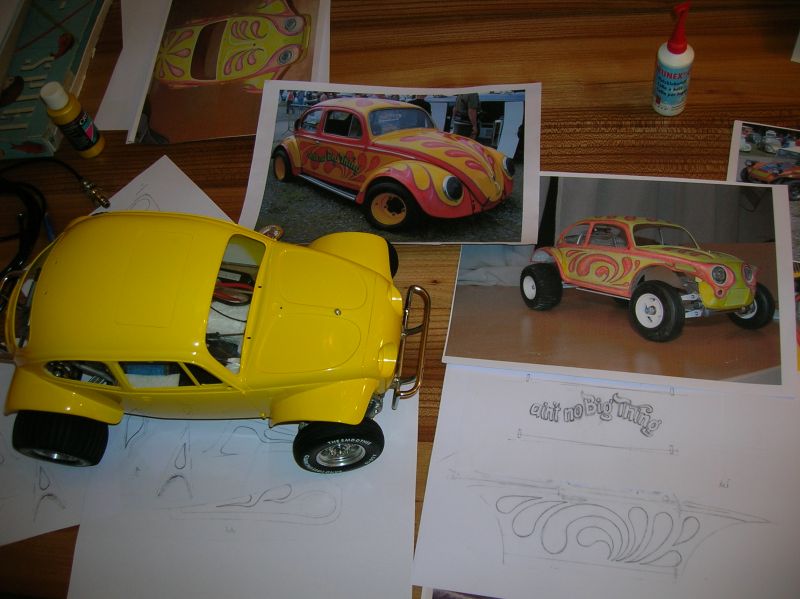
On www.offroad-cult.de i found pictures of a built but unpainted Sand Scorcher shown from different perspectives. An ideal starting point for doing some design studies! When i saw that the concept was fine, i started making templates by copying all the body panels to draft paper and drawing all the bits and bobs in real scale. Once these patterns were fine i fotocopied them to get the mirrorred sides as well. From these copies i could finally make punch through copies to the masking films. After cutting them the masks where ready to be applied. 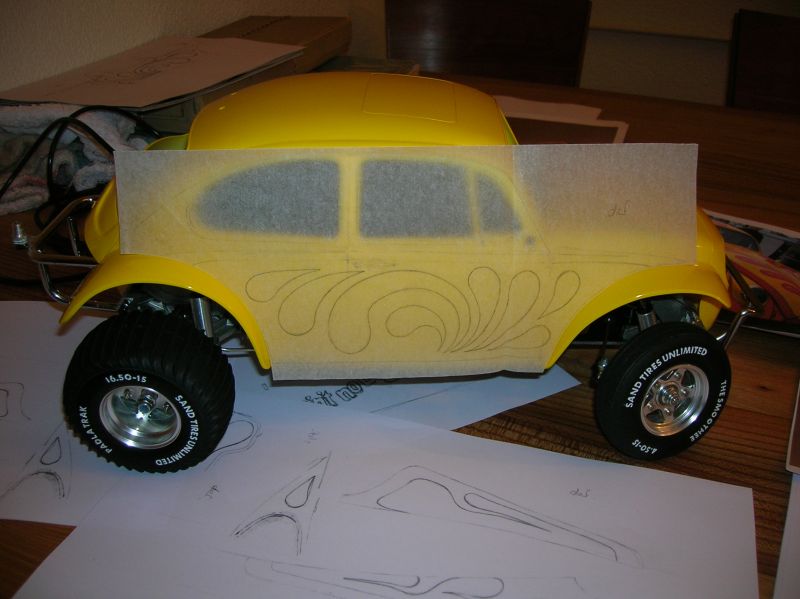
Body Preparation: Inspired by the car on offroad-cult.de i did some minor modifications to the body: The Sidesteps got chopped off completely. The Tips of the Front wings got a sloped shape while the lower edges got slightly tapered. The Result is a cleaner and Swifter Bodyline. Before painting the body got sanded and washed to make sure the color will stick. The Doorhandles would have interferred with the side paintings so i decided to cut them off. But before doing this i copied their shape with an Aluminium Foil and a Q-Tip. This Footprint of the Handle got filled with epoxy glue from the back an cut out when the cement has dried. Like this i got a nice flat Working surface and a shiny pair of door handles in one go! Painting Advices: I generally use various types of Enamel Paints. I very strongly would anyone disencourage from using any kind of Acrylic Paints. I made some very bad experiences with that kind of coulour So i can only give you this parental Advice: If you love your Model Paint it the old Fashion Way! For the Spraying i use two different types of Airbrush Guns: One is medium Size (still Small compared to a Standard sized industrial Spray Gun) This one is perfect for Painting Layers on the entire Body. For fine details Such as the shadings in the red/tangerine Painted Stripes, Reflections or the Writings the De Vilbis Super 63E is just perfect. But First we Start of with the Basic Colour wich is a very intense Yellow. I usually ad between 20-30% of Thinner to the Colour. The Color in the Airbrush should have the Consistence of Creamy Milk and the Spray Pressure should be rather moderate. Try on a sample and when you see that the Paint is laying down nicely start with the real Thing! If the sprayed result tends to be too thick (Orange Peel) then either the Color is too thick Or your Pressure is wrong. If the Color makes runners this means that the colour is too thin. If you ad thinner or colour directly into the Airbrush tank make sure you stir up well before continuing. It still takes a while before the Airbrush reacts to a changed mixture. This is because you dont reach the tip of the Gun so you first need to Spray it out before you will notice any differences. Anyway. After the first Layer i gave it a second one with Yellow Metallic and to seal this of a third layer of Clear Coat was added. One of the major Problems every DIY painter has to deal with is Dust. When the Colour is finally dry sometimes it seems as if the model had been Powder Coated. The Problem is that it usually takes quite long until the Paint is not sticky anymore. There is a way to cut down both the Amount of dust and the open time of the Colour dramatically. All you need is an oven - and forgiving family members! I usually heat up the oven briefly before i begin to paint the model. Caution: The Body is made of Polystirene wich is quite heat sensitive. NO HEATING WHEN THE BODY IS IN THE OVEN! The temperature shall not exeed 50° Celsius. That is a little more then luke warm - Definitely NOT HOT! Make sure all your Family Members know what is cooking in their kitchen. Otherways you will put your Model as well as your Family Peace at a very high Risk! When you finished the Paint Job (wich you probably did in the cellar or somewhere outside) Put it into the oven (Remember: No Heating and no Fan!) Usually it wont take more than two hours to obtain a dust dry surface. Once the Model is out of the Oven make sure all stains of Paint in the Oven are completely removed. Allow the fumes to leave the room. Burn Out the Oven before reusing it for its primary purposes! Note: This procedure may free hazardous substances. For closer information check with your local Doctors! 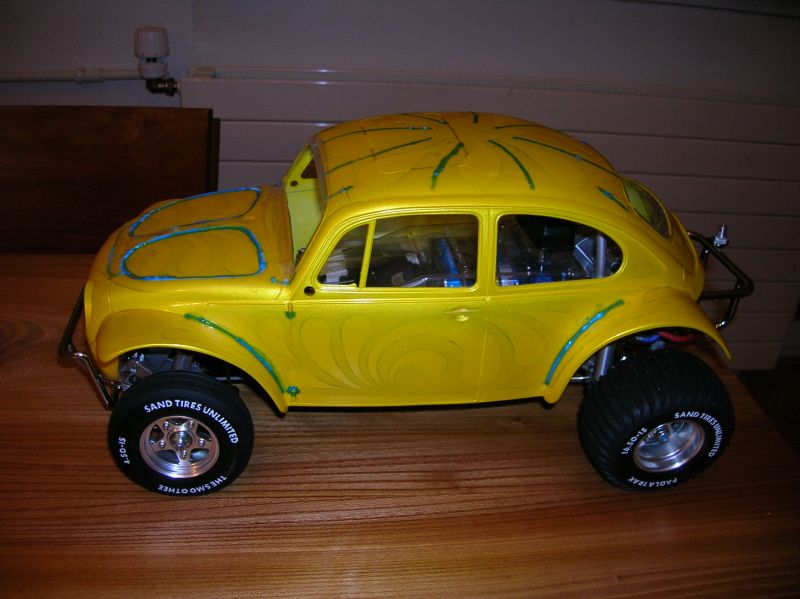
Masking For those who are not familiar with masking issues some hints might be useful. Masking films and liquid masking can be bought in art stores where they sell stuff for painters, airbrush accessories and that sort of things. For applying the masks a Hairdryer, a water pump Spray, Q Tips and a Fuss free Cloth will also be needed. I peel the mask of its carrier and soak both the Mask and the body generously with water. When i lay the mask on the body it is floating on the water and it is easy to slide it into its definite position. Once the mask is in place i rub the water away with the cloth or with Q-Tips. Some heating with the hairdryer will help to make the mask smooth and flush. On rounded places such as the roof i needed to cut the mask in segments. Places where the masks join or overlap need to be sealed off with liquid masking film. When all the masking was done i doublechecked if i hadn't forgotten any hidden angle that aso needed covering. Before i started with the orange i applied one Layer of Clear Coat. The Problem is that the Color always tends to sneek under the Mask. By using the Clear Coat i seal off the edges and minimize this tendency. So finally i could Start with the real Stuff: One Layer of Orange was sprayed all over the Model. Next came a coat of transparent metallic Red. This was applied along the edges only to give it a 3-Dimensional effect. To make it look real "Bubbly" i added white Reflextions. By now the Car looked quite Psychedelic: 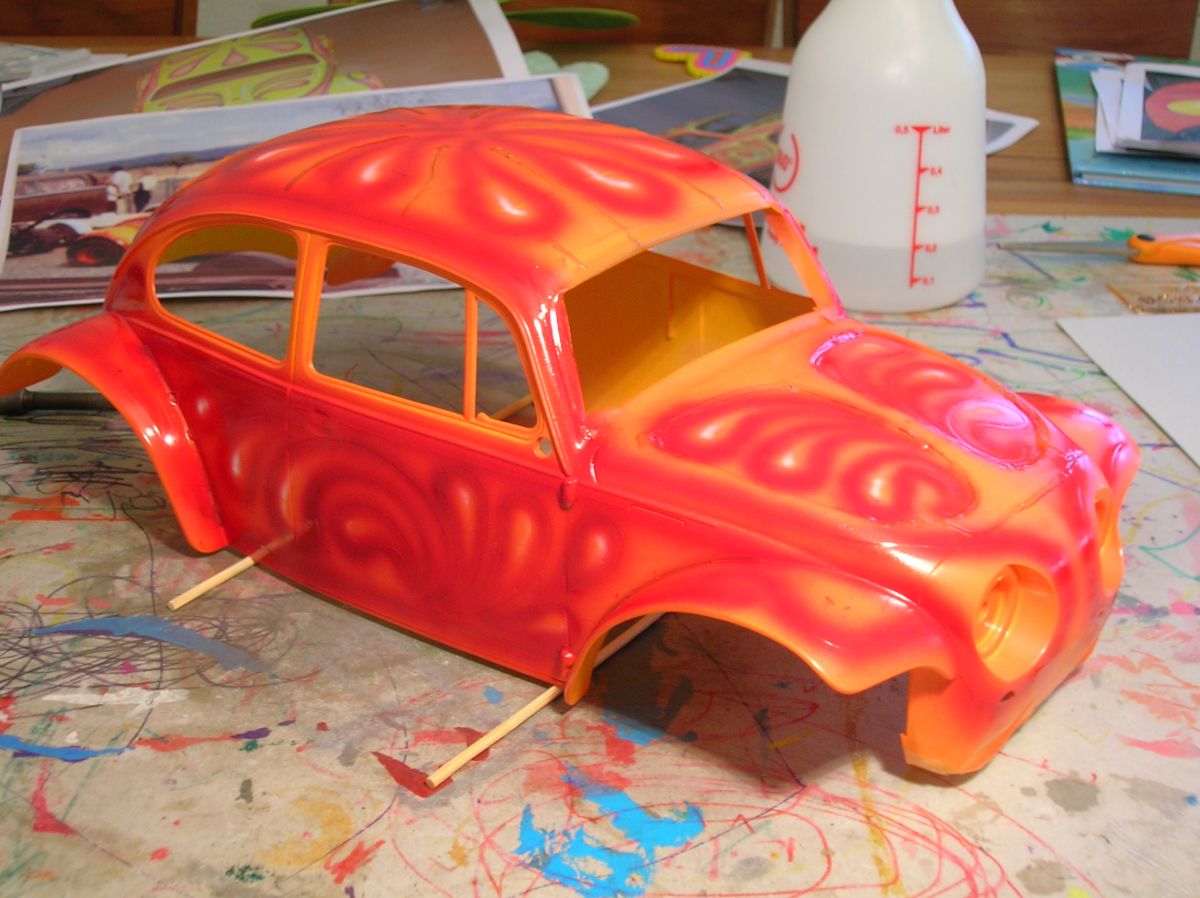
But that was just the beginning: Now i had to draw the blue Lines which split the Yellow from the Red Areas. This was tricky because the blue Splitter-Lines should have a more or less equal width. But how to judge the with of a Line when you cant't barely see where the masking starts and where it ends? The lines along the doors where Especially difficult to make since they are completely straight. I helped myself by masking off both edges off the Line. The Rest of the car was Painted free Hands. Now the car looked real Pscychic (it actually suited my mood quite well after hours of full Concentration on hitting all these Lines) The tension had reached its Peak: The Moment had come to unveil the Result of my work! Would the masks come of as easy as i hoped? Would my Clear Cote Theory stand the Test of Reality? Would the coulors stick to the surface? Would it look as planned? - After pulling down the first Masks i saw: My theories worked - almost! Of Course here and here i had to do some corrections because some colour was peeled off or gut pulled under the Maskings but after all these were mainly Cosmetics, nothing to be worried about! Now the car really started looking like the Thing i had in Mind at the very beginning! The next Step was the writing. For this i made another mask which was painted in yellow and green. The Outlines in Blue and the white Reflextions where straightforward. By now my Masterpiece was almost finished. All that was missing was a final Layer of Clear Coat and some Body trim! - Who would stop me now? There's an old Racers Wisdom that says: To finish First, first you have to Finish! There is so much wisdom in this simple Phrase that its almost a shame to tell this Story: When i Sprayed the Final Coat i brought the body back into the Oven to let it dry. Everythig would have been perfect if i just let the Body alone overnight - But i didn't! After Months of drawing, cutting and Spraying and dreaming i had become just a litte impatient... So i decided to heat te Oven up once more. Just for a couple of minutes to make the Colour dry a little quicker... This was a fatally wrong Idea! I just realized my Error when i looked through the Glass one Moment later: The Front end of Mlitterally started to melt down! With an Expression of Horror on my Face i pulled the Body out of the Oven. The next days i spent giving myself Names what a bloody Idiot i was... It took almost a week before i finally found my courage to save what was left of that fateful evening. The Problem was that the entire Nose from the windshield on rally hung down: Window Frame, Hood, Nose, Fenders, everything had gone out of shape! I decided: If it was Heat that had destroyed my work it was also Heat wich was going to save it. So the only Way was to heat the Body gently up to temperature again and try to bring it back to shape. After the first attempt with a Hairdryer failed i tried with a more powerful industrial Dryer. After endless Fears and a couple of burnt Fingers it was finally done: The car got back in its original Shape! Just a slight deformation on the Front nose reminds me that this Car almost ended before it had started! Now the Car is finished and in Regular use. Of Course i drive it carefully but it would be a Shame not to use this little Beauty every Now and Then for what it was built for! I hope you will find Creativity and Strenght to realize your Dreams just as i did with this Little Bugger! In the end it ain't no Big Thing! Best Wishes Gaudenz from Zurich, Switzerland
The following user(s) Liked this: GToddC5
|
|
Last edit: by superfischer.
The topic has been locked.
|
Sand Scorcher 2010 - How to build a dream 11 years 1 month ago #19725
|
  Cool vintage heavy cal look. I love it. Good luck for the "bubbleing"
The following user(s) Liked this: superfischer
|
|
The topic has been locked.
|

Sand Scorcher 2010 - How to build a dream 1 year 3 months ago #73513
|
Wow, I love it. I was searching for Sand Scorcher paint jobs t get inspired and came across yours. It is amazing! I do have experience with airbrushing but I think this is over my experience level. I love the 70s colors too. I may use those colors on my build but in a way my limited talent can achieve the desire outcome.
|
|
The topic has been locked.
|
Sand Scorcher 2010 - How to build a dream 1 year 3 months ago #73521
|
I'm going to lock the thread - anyone looking at it on a smart phone will not be able to see its age.
It's nearly 10 years old & as far as I can see, the OP hasn't been back since their 1st post. Replies from them seem unlikely. ") |
|
The topic has been locked.
|

Time to create page: 0.111 seconds