Keyword
  • Page:
  • 1
  • 2

TOPIC:

Blakbird's 56307 Mercedes 1850L Build 3 years 9 months ago #61002

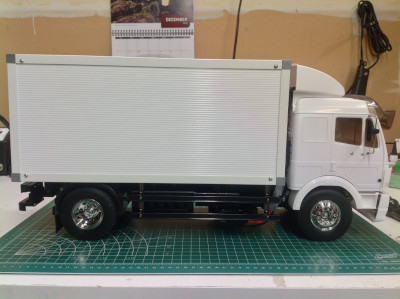
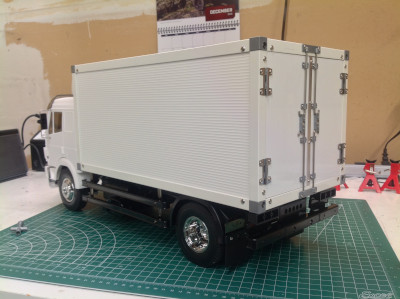
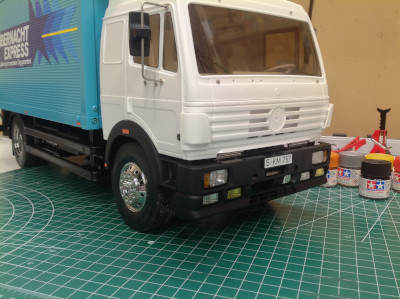
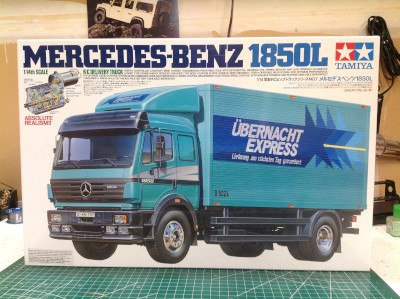
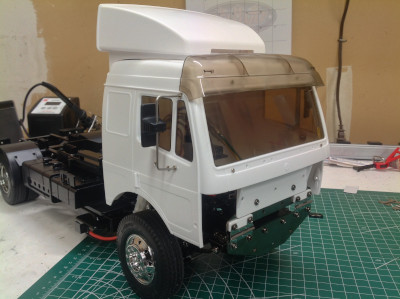
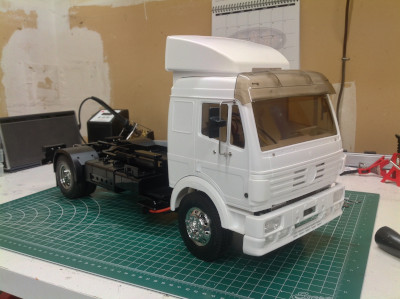
Mercedes Benz updated the appearance of their SK (Heavy Class) line of trucks in 1994. Tamiya followed suit in 1995 with the 56305 Mercedes Benz 1838LS and the 56307 Mercedes Benz 1850L. Both use the same cab but the 56305 is a 4x2 tractor truck and the 56307 is a box truck. They represent the 3rd and 4th tractor truck models made by Tamiya, respectively. For me this Delivery Truck is my 6th Tamiya tractor truck build, so the chassis and gearbox are becoming quite familiar by now. This is my 1st with a single drive axle though, so that combined with the long wheel base make it different to drive.

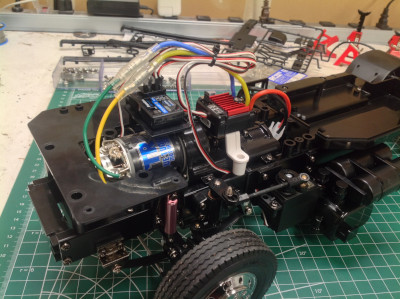
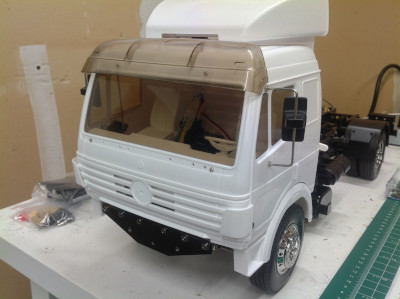
Like the other tractor trucks, this is a leaf sprung model with a 3-speed transmission and solid C-channel frame. The rear axle is driven and features an open metal differential. It is capable of using the MFC (Multi-Function Control Unit) for lights, sounds, and vibration, though it is old enough to have actually been designed for the original 56501 Electrical Unit Set. The doors do not open but the cab tips forward to access the inside. An interior dash and seats are included. I swapped out the stock silver can motor for a TR Tuned motor made specifically for these tractor trucks which seems to offer more torque at less rpm.

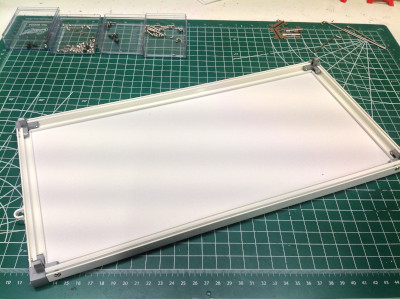
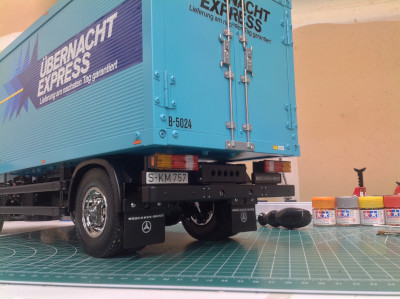
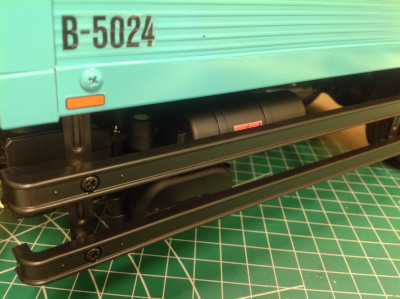
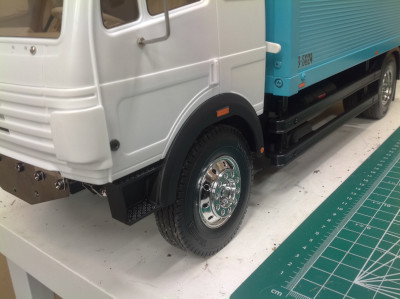
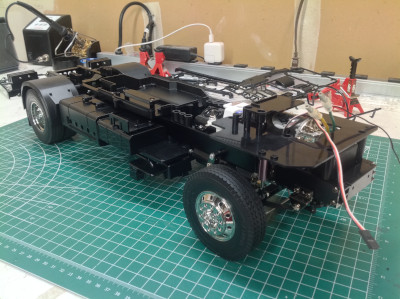
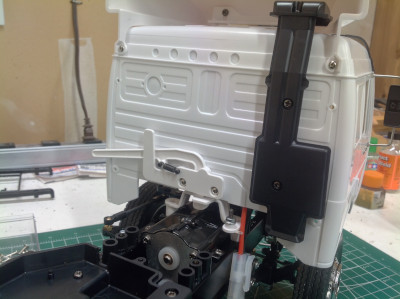
Given the similarities between all the Tamiya tractor trucks, I like how different this one is owing to the cargo box. A comparison with the shipping container of the 56326 trailer seems inevitable, but they are actually built quite differently. The box on this truck uses real corrugated aluminum sides while the shipping container (which didn't come out until 2011) uses vacuum formed ABS. I was able to conceal all the control boards and wiring for the Multi-Function system inside the box which allowed me to retain the dash board and seats inside the cab.

Since I've already fully documented a tractor truck build on my King Hauler page and the chassis is 90% similar, I'll be providing only a cursory overview of the chassis build here.

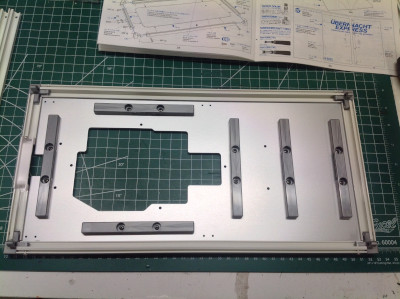
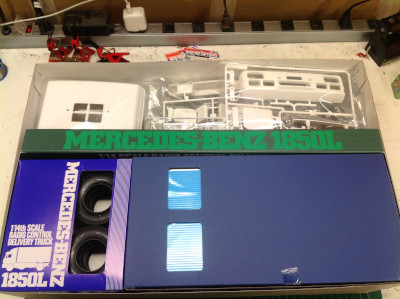
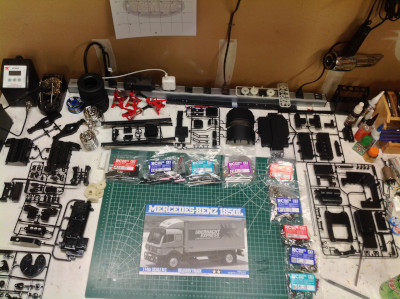
The 1850L comes in a typically huge box which looks strangely empty when opened. The lower right quadrant is covered by an internal box containing the walls, roof, and floor of the cargo box. Most of the chassis parts are located beneath this, while the body parts are in the upper half. Finally, most of the hardware is located in the box with the tires.
Here are the parts for the chassis including the 9 hardware bags. The super long chassis rails are sitting in back along my power strip.
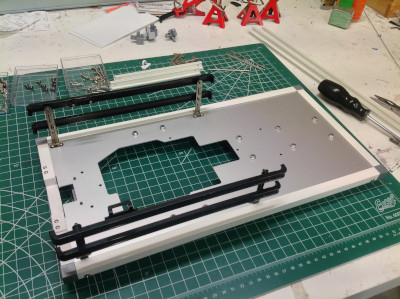
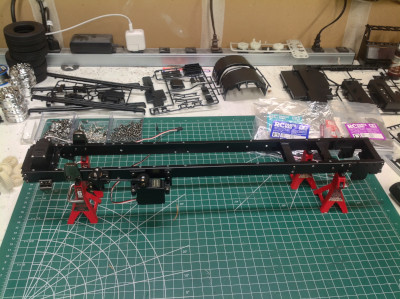
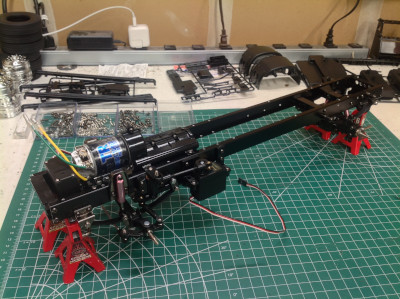
The basic ladder frame is completed quite quickly. The front servo is for shifting the transmission while the servo on the left side is for steering. You can see the shock hoops and leaf spring hangars to the left (front) and a few cross members to the right (rear). The transmission itself will become the primary cross member.
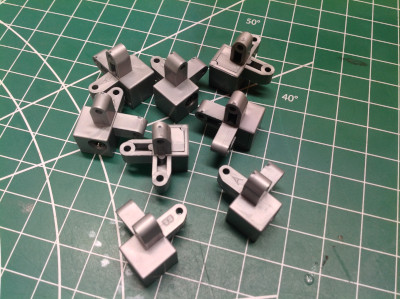
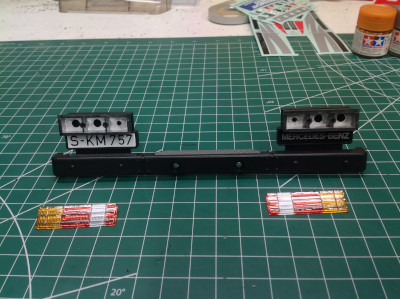
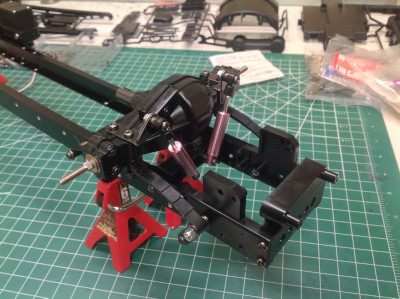
In the left hand picture you can see the inverted front end of the chassis with the solid front axle and leaf springs. The right hand picture shows the solid rear axle with open differential and diagonal dampers.
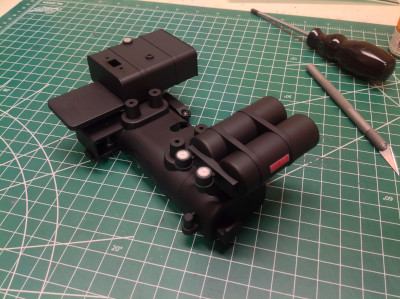
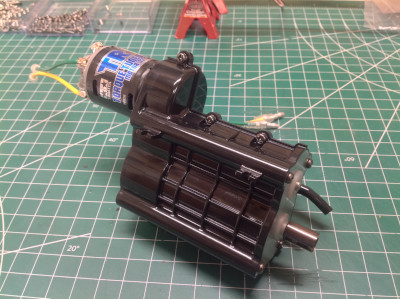
The 3-speed transmission is common to all the other tractor trucks. I installed the Tamiya TR Torque Tuned motor which is ideally suited to these trucks. The right hand image shows this installed in the chassis.
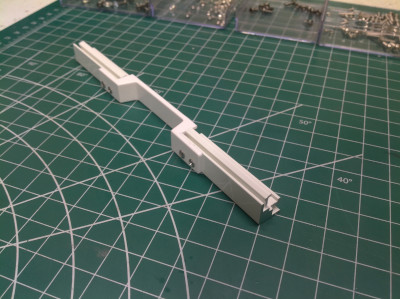
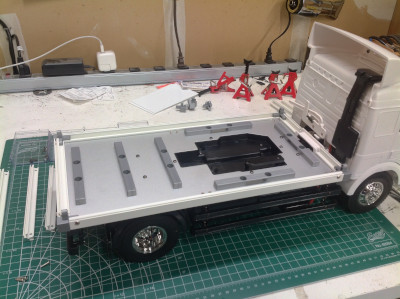
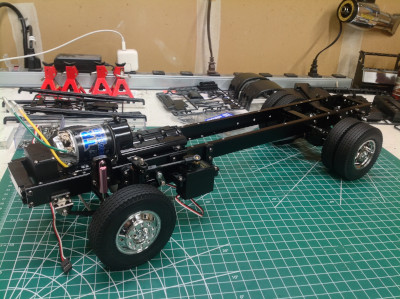
The rolling chassis is now complete with the installation of the wheels and tires, but many details still need to be added. I think this truck uses the longest dog bone drive shaft I have ever seen.
The following user(s) Liked this: Jonny Retro, stingray-63

Please Log in to join the conversation.

Blakbird's 56307 Mercedes 1850L Build 3 years 9 months ago #61003

I've installed the electronics platform surrounding the motor and also the tanks and compartments on either side of the frame. The battery sits under the chassis rails between the tanks and there are wheel arches over the rear wheels as well. The irregular tub in the middle of the chassis is a tray for the old Electrical Unit Set. On the right you can see the minimal temporary electronics I installed to test out the chassis.
I decided to assemble the entire truck in an unfinished state before returning to paint and decorate it later. The cab is mostly one big part with a windshield, side windows, mirrors, wind deflector, and sun shade. On the back you can see the latch which releases the cab to swivel open and the exhaust stack.
On the left are the seats, the dash, and the grille. On the right you can see them installed onto the truck. This is a really simple process when you don't bother painting anything.
A light bucket on either side of the bumper contains 3 lenses with positions for 4 lights. The lenses on each side are molded into a single part. On the right you can see the completed cab. If this was a tractor truck I'd also be attaching some side fairings, but they are not used for the box truck version.
The following user(s) Liked this: stingray-63

Please Log in to join the conversation.

Blakbird's 56307 Mercedes 1850L Build 3 years 9 months ago #61006

Nicely done :) I like the trucks and have often thought about getting one but I wouldn't use it so couldn't justify the money they cost :D Looking forwarding to seeing this in paint :)
If you can't fix it with a hammer, you've got an electrical problem mate :)

Please Log in to join the conversation.

Blakbird's 56307 Mercedes 1850L Build 3 years 9 months ago #61014

Building the box starts with the part shown at the left. This may look like a bumper, but it is actually the lower front rail of the box. The cutout is there to clear the rear end of the transmission housing. The corner blocks shown at right are the key to assembling the box. These hold the 3-dimensional right angles at each corner.
The first thing to assembly is the cargo box sub-floor. There are 4 rails around the perimeter and the center panel is an aluminum sheet. The cutout in the sheet is for the electronic tray. The 6 beams shown act as stiffeners to support the cargo floor which sits on top of them. In the right picture, you can see the side guards which hang down below the box.
Now the sub-floor can be attached to the truck. You can see how the electronics tray sticks through, and how the plastic slab floor sits on top. The edge rails are all aluminum extruded forms with slots for the panels. The side panels are corrugated aluminum while the front, bottom, and top are plastic. The sub-floor is also aluminum.
Here's the roof. It is built just like the floor and then just plugs into the box walls from the top.

Please Log in to join the conversation.

Blakbird's 56307 Mercedes 1850L Build 3 years 9 months ago #61015

Nicely done :) I like the trucks and have often thought about getting one but I wouldn't use it so couldn't justify the money they cost :D Looking forwarding to seeing this in paint :)

The King Hauler was actually the first Tamiya I ever built. They are expensive as you say and I don't use them nearly as often as buggies or touring cars, but it is fun to get them out from time to time on a nice sunny day for a run up and down the road. Would be more fun with a few friends doing the same thing.
The following user(s) Liked this: AndyAus

Please Log in to join the conversation.

Blakbird's 56307 Mercedes 1850L Build 3 years 9 months ago #61016

The plastic rear doors have a fairly complex latching system which grabs the upper and lower rails to hold the door shut.
Now the truck has been physically completed. The doors were the very last thing installed. At this point I was able to drive it around and decide if I wanted to change anything before committing to painting it.
Attachments:
The following user(s) Liked this: 1972 LeMansGT Jim

Please Log in to join the conversation.

Blakbird's 56307 Mercedes 1850L Build 3 years 9 months ago #61018

  • Al
  • Al's Avatar
  • Offline
  • Impressive Numbers
  • Impressive Numbers
  • Posts: 1496
  • Likes received: 1734
Fantastic build and description as ever.

Please Log in to join the conversation.

Blakbird's 56307 Mercedes 1850L Build 3 years 9 months ago #61025

I had a doubt when I bought the aeromax. But the ford has 2 rear axles I prefered. And the box trailer.

Please Log in to join the conversation.

Blakbird's 56307 Mercedes 1850L Build 3 years 9 months ago #61067

The one color Cobalt Blue paint scheme might seem quite simple, but that doesn't make it easy. I started with the box. Because it consists of a combination of metal and plastic, I chose to prime it white first. I also decided to paint it already assembled rather than paint the parts separately. This results in paint on the fasteners as well, however I left out the rear door latch hardware so it would still appear metallic. The hardest part of the whole project was the application of the huge stickers on the side of the box. It is always hard to apply large stickers without bubbles, but the presence of the corrugations makes it even worse. The other side effect of the corrugations is that is very easy to see if the sticker is not straight because it will not line up. You only get one chance to put down the sticker straight and then smooth it out. After I was done, I applied clear coat to the whole thing.
Here's the fully decorated box attached to the chassis. The side rails you see between the front and rear axles actually hang from the box so they needed to be painted flat black and attached now as well.
Tail lights are always tricky. I started by assembling them to the rear bumper and spraying the whole thing flat black. After that I used a brush to apply chrome silver paint inside the light buckets. The lenses come off the tree clear, so I applied transparent red and amber paint as shown. Note the entire inner third of the lens ends up lighting up white with the reverse lights even though it should really be split into a reverse light and an inner tail light. The right hand picture shows all of this installed in the truck along with the license plates, mud flaps, and stickers.
The fuel tank on the right side of the chassis got replaced by an MFC control panel, but the oil (or air?) tanks and battery box on the left side remain. I painted them flat black and applied the stickers as shown.

Please Log in to join the conversation.

Blakbird's 56307 Mercedes 1850L Build 3 years 9 months ago #61068

The front fenders are separate parts from the cab. I painted them with semi-gloss black and applied some amber marker stickers. There is no mechanical attachment between these parts and the cab; the little tab on top just sticks on with double sided tape.
Quite a bit of painting is required to make the headlights look good. First you need to surround all the lenses with flat black. The amber markers are intended to be stickers, but I don't think this looks very good so instead I painted them transparent orange as shown on the left. I still used the black portion of the sticker as a divider though. You can see the final result on the right. I also chose to paint some of the fog lights yellow for some variety, and also because I saw some pictures of real Mercedes trucks using this scheme.
Here are the lenses installed in the front bumper. You can see that I screwed up the yellow lenses. I should have painted both outside lenses but instead I painted both right lenses. I had to go back and fix them later. The right hand image shows the completed (but not corrected) bumper on the truck.
The grille needs some careful painting. The border is blue but the slats are flat black. The Mercedes star is a separate plated part, as are the side air deflectors. The dash board is also nicely detailed, although it is almost completely unseen once the cab is assembled. The windows are tinted so the interior is not very visible.
The following user(s) Liked this: stingray-63

Please Log in to join the conversation.

  • Page:
  • 1
  • 2
Moderators: caprinutstingray-63AndyAus
Time to create page: 0.293 seconds
Cookies are required to make this site work. If you continue to use this site you permit us to use cookies.