|
|
|
TOPIC:
Blakbird's 58256 Juggernaut 2 Build 3 years 11 months ago #59529
|
The original monster truck was the 58065 Clod Buster from 1987 which Tamiya just kept right on making, but in 1999 they came out with the 58232 Juggernaut as a successor with a lot of similarities and a lot of differences. Apart from the obvious change from a Chevrolet body to a Ford Body, the other changes are significant. Among the defining features of the Clod Buster are the huge wheels and tires. The tires of the Juggernaut are the same overall size, but the wheels have a new slot pattern and the tires have gone from cylindrical to toroidal. These tires are unique to the Juggernaut and because the Juggernaut is so rare, for reasons which shall be explained later, the tires are nearly impossible to replace. The Clod used a hybridized form of 4-link suspension, but the Jugg has gone to a leading and trailing arm 4-link type. Since the links are not triangulated, something else needs to center the axles. This is done with leaf springs which are present in addition to eight coil dampers. The dampers don't actually offer any damping though, and the the leaves are stiff enough to make them moot in any case. The massive steering hubs from the Clod have been retained, but the axles are all new. The change is to convert from the MOA (Motor on Axle) system of the Clod to a centralized dual motor transmission. The motors are in parallel and drive a single spur gear. The axles contain gear reduction of their own and massive metal open gear differentials. Like the Clod, the Jugg has four wheel steering driven by a single chassis mounted servo. The servo savers have been improved to be less sloppy, but the reverse Ackerman of the steering knuckles still makes the steering pretty bad.
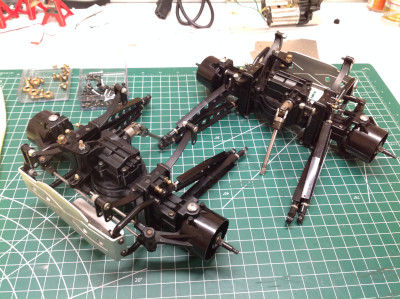
Most people don't know much about the Juggernaut, but if they've heard of it all they remember that it was terrible. One of the gears inside the transmission could easily spin free of the hex which was supposed to lock it to its shaft, and the gears inside the axle housings did not have enough support so the teeth would force them apart and strip the gears. Those unlucky few who bought the original release of the Juggernaut found it unusable usually within a single battery pack. The outcry was vociferous for good reason. Tamiya quickly came up with an upgrade pack and offered it free of charge, but the damage to the reputation of the Juggernaut was done. Stores wouldn't stock it and consumers wouldn't buy it. How Tamiya managed to miss these egregious problems in their testing is unknown. In an attempt to pave over the problem, Tamiya released the 58256 Juggernaut 2 in 2000, just a year after the original release, and quietly tried to pretend that the original never happened. The box art color changed from black to red and the stickers changed to match. Tamiya prominently molded the number "2000" into the changed axle and gearbox housings to make it clear to everyone that the parts were different. Though the mechanical problems were well and truly solved, the reputation of the chassis could not be restored. The new version didn't sell either, so the 58280 TXT-1 arrived in 2001 to replace it. Although I love the TXT-1, the history is unfortunate because the Juggernaut 2 is a very good truck. If you decide you actually want a Juggernaut, good luck. Both versions are very rare, with the original being extremely scarce due to its short run. If you actually want to drive it you need a Juggernaut 2, but I much prefer the livery of the original. My goal was to get a 2 but paint it like a 1. It is still possible to get one new in the box, but it will cost you thousands of dollars. I was able to find a mildly used Juggernaut 2 already assembled for a "reasonable" price, and I then cleaned and rebuilt it to look like an original Juggernaut. I upgraded the electronics to be modern and I find this thing to be a joy to drive. By that, I mean that it is terrible. With those big empty tires and no dampers it bounces like crazy, but that's what makes it fun. It looks great as well. One of my favorites despite, or perhaps because of, all the work that went into getting one. Here is the Juggernaut 2 in the state I received it. The stickers have been applied but the body was never painted. There are some scratches, especially in the chrome, but mostly the body shell is in good condition. One of the tires has a big crack in the side wall but these irreplaceable tires otherwise look good. The chassis is a bit dusty but looks to have hardly ever been used. In fact, I was able to plug in a battery and use the truck with the original electronics and mechanical speed controller with no problem. 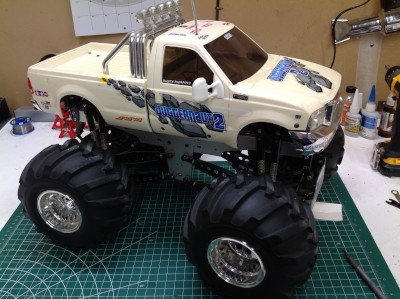

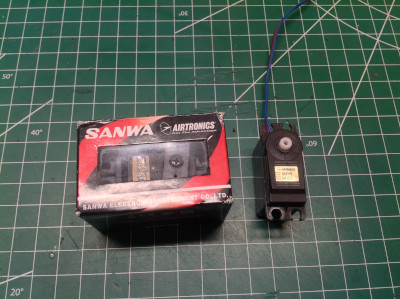
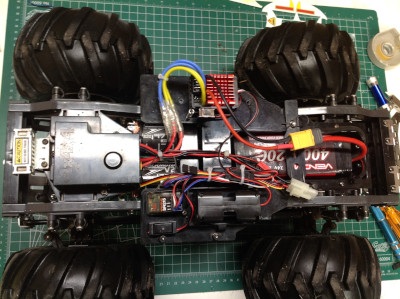
Here is a closer look at the original electronics. The resistor sits at the very front of the chassis. The 3-speed mechanical speed controller and throttle servo sit under a plastic cover behind that. There is a slot for a 4-AA battery pack for the radio, but the original builder used an Airtronics receiver with a built-in BEC so this was not needed. The original servos were Airtronics (Sanwa) as well, a fact which will become important later. 
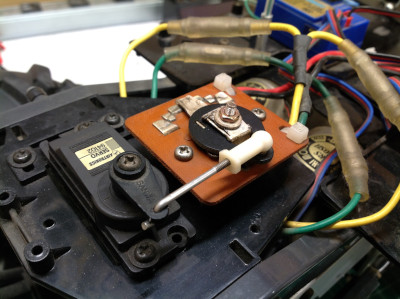
Here is the full electronics package removed from the vehicle. My original plan was to re-use the original silver can motors but replace pretty much every thing with modern electronics. I'll keep the original MSC and resistor in place for posterity, but they won't be connected to anything. With a rated torque of 42 oz-in (3 kg-cm), I'm surprised the original Airtronics 94102 servo was able to steer the truck at all. Keep in mind that a single servo drives all 4 monster wheels. 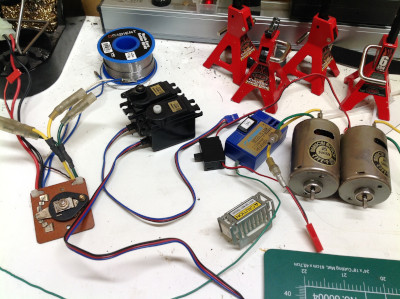
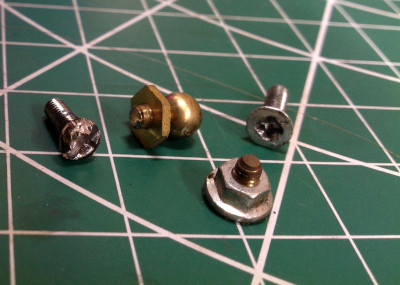
All right, let's tear this thing apart. There is a LOT of hardware in a Juggernaut. Seen on the left are all the nuts, bolts, screws, clips, washers, ball joints, and springs. Time (and an over enthusiastic use of thread lock) had taken its toll on some of the hardware. Shown at right are a sampling of the parts which broke or stripped during disassembly. Luckily, all are common parts and were easily replaced. 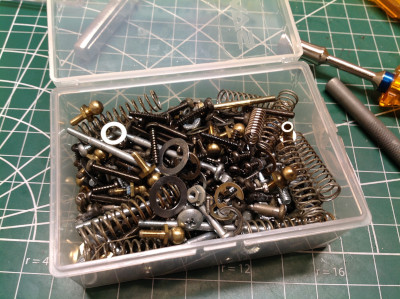
The following user(s) Liked this: mongoose1983
|
|
|
Please Log in to join the conversation. |

Blakbird's 58256 Juggernaut 2 Build 3 years 11 months ago #59530
|
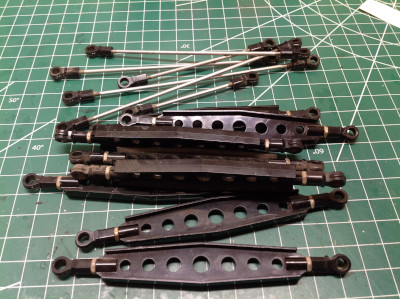
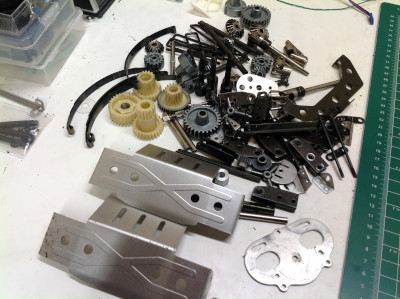
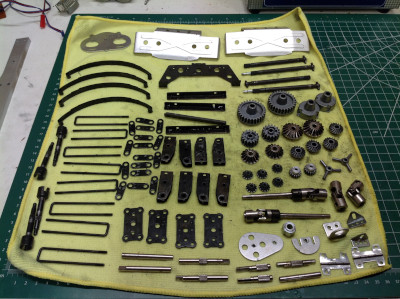
On the left are all the original links. There are 8 identical suspension links and 6 steering rods. I did not bother removing the rod ends from the links as all were in good condition. I only adjusted the lengths as necessary. On the right are all the non-fastener hardware bits, mostly all metal. Represented we have gears, bumpers, leaf springs, axles, motor plates, and lots more good stuff. This is the heaviest section of parts.
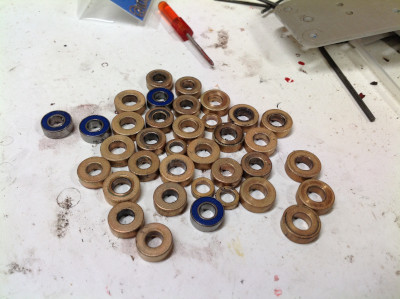
This may not look like all that many plastic parts (and it isn't), but many of them are very large including the axle housings and battery tray. There were no broken plastic bits to my great relief. On the right you can see the pile of original bushings. Only 4 ball bearings were used in the original kit, but I replaced everything shown with brand new rubber shielded ball bearings. 
Working in batches, I loaded everything into the ultrasonic cleaner and tried to get all the old dirt and grease removed to make the parts look as new as possible. The results are shown below. On the left are all the fasteners and on the right are the rest of the metal parts, fully knolled. 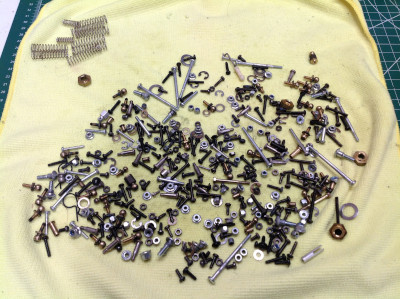
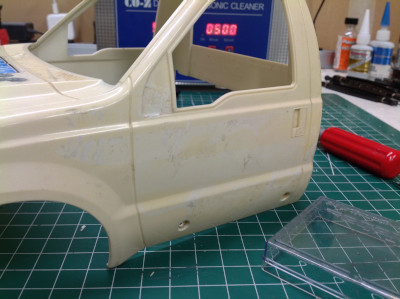
One of the biggest problems with vintage RC bodies is the tendency of the stickers to lift and peel. That means that intentionally removing them should be easy, right? That's what I thought, but I was very wrong. The stickers proved to be incredibly stubborn and had to be individually chiselled free with a wedge tip blade. It took me hours. The result is shown on the right. You can see discoloration where the stickers were. Actually, what you are seeing is yellowing everywhere else but protected areas behind the stickers. No matter, I am going to paint this anyway. 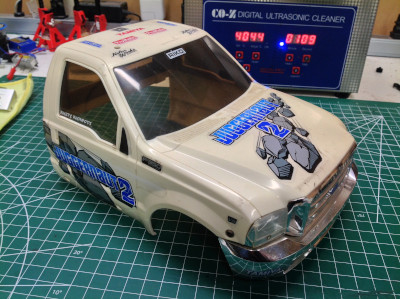
For some reason I did not take any pictures of my tire restoration project, but it probably consumed the most time. Given that the tires are unique to this model and cannot be replaced, I wanted to make sure they were soft and supple, not hard and cracked. The best way to do this, as I've been lead to believe, is to soak them in glycerin. Sounds simple enough, but these are very big tires and they were not actually made to be removed from the wheels. The Juggernaut shipped with the tires and wheels already assembled for good reason; they don't stretch and are pretty much impossible to remove without destroying them. That meant I needed to soak them as an assembly, but the only way to get the glycerin to flow inside the tire was to vent them and then submerge them for many hours to allow the viscous fluid to bubble in. Then I had to try to squeeze it all back out of the now incredibly heavy tires, a process which took even longer. It took me the whole weekend, but I finally got a set of new looking tires. I wasn't able to patch the tear in the sidewall of the single damaged tire without access to the interior, but it seems to be stable and not growing. The cleaned tires are pretty slippery and will sometimes spin in the wheels. It's like a free slipper clutch. |
|
|
Please Log in to join the conversation. |
Blakbird's 58256 Juggernaut 2 Build 3 years 11 months ago #59533
|
The Mammoth Dump Truck shares the same chassis as the Juggernaut 2 and I've already had the opportunity to build one brand new from the box, so most of the details about the building process and the differences from the original Juggernaut and Clodbuster chassis can be found on
that page
. Here I will concentrate on any differences or interesting aspects of this particular build.
The major difference between the Juggernaut and the Mammoth is that the Mammoth uses only a single motor with an extra stage of gear reduction while the Juggernaut uses two motors. The Jugg also uses a slightly larger 15T pinion. The Mammoth therefore has a final drive ratio of 91.6:1, making it very slow, while the Juggernaut has a ratio of 34:1 as well as the extra torque of a second motor. The transmission assembly is shown on the left while the completed axle assemblies are shown on the right. Note that the rear axle of the Jugg has steering while the rear on the Mammoth locked out the rear hubs. Everything went together cleanly with no problems. 
The steering servo presented me with a particular problem. The Juggernaut chassis does not use a typical servo horn, instead it uses a custom horn which is braced by a metal bracket with a round guide as shown on the left. The model I bought used an Airtronics servo which had a 23 tooth spline. All of the servos I would normally use have a 25 tooth spline. No problem if you are building from scratch since the kit comes with both 23T and 25T horns, but because I bought the model second hand I did not have the alternate 25T horn. Since this parts tree is unique to the Juggernaut, getting a replacement horn is not viable. This meant I needed to find a modern Airtronics servo with a 23 tooth spline so I could use the old horn. This brand virtually does not exist in the USA, but I was able to order a digital Airtronics servo from a seller in Italy shown on the right. It took a month to arrive, but my Juggernaut now has 8.5x more steering torque than when I bought it. 
While bumbling about my local hobby store one day during the build, I noticed these inexpensive new brushed motors from Yeah Racing. I thought putting in a pair of 17 turn motors along with steel pinions was a good opportunity to improve the speed and torque of my model given that the Hobbywing dual motor ESC I am using could support the current. It was a good call. These motors may be cheap but they bring the performance of the truck to a whole new level. Highly recommended. Note that a Tamiya TEU-106BK dual motor controller like the one that comes with the Super Clodbuster would not be able to drive these motors. 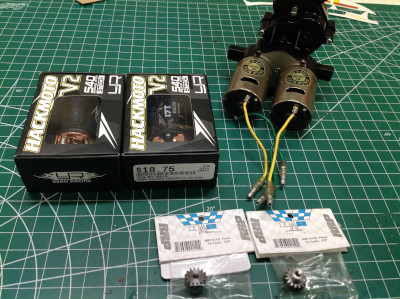
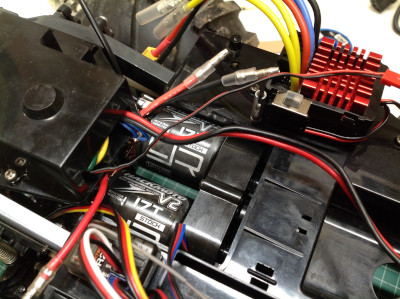
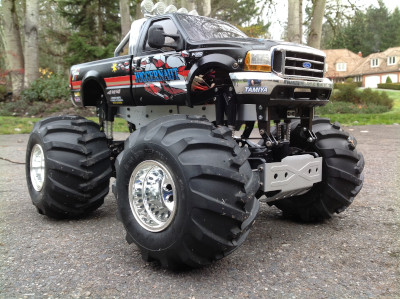
Here's the completed chassis before and after the electronics were installed. Most of the wiring you see is vestigial from the now defunct MSC system. The shine you see on the tires is the residue of the glycerin I used to revive them. At the time the Juggernaut was new, you could get upgraded metal suspension links and oil shocks for it, but they have become very difficult to find and expensive if you can find them. For now, I am stuck with plastic links and useless friction dampers. Given how stiff the leaf springs are, the dampers are pretty much irrelevant anyway. 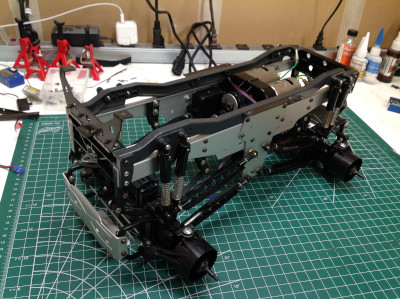
The following user(s) Liked this: stingray-63
|
|
|
Please Log in to join the conversation. |
Blakbird's 58256 Juggernaut 2 Build 3 years 11 months ago #59535
|
The original grille had never been painted. The MCI sticker sheet I bought did not include the Ford logo, so that meant I needed to reuse the old one. I removed it as carefully as I could and preserved it, then painted the black areas and the amber on the light lenses. The turn signals are intended to be stickers, but I like the look of transparency much better.
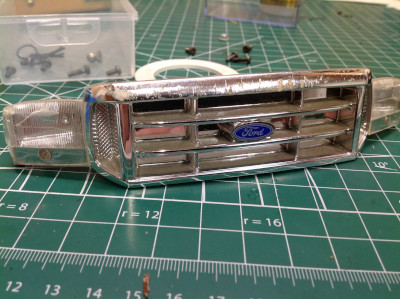
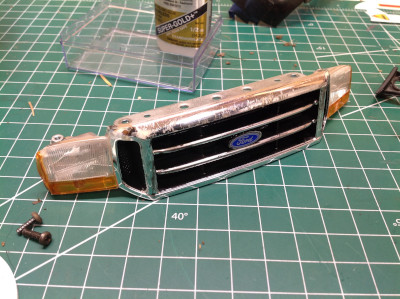
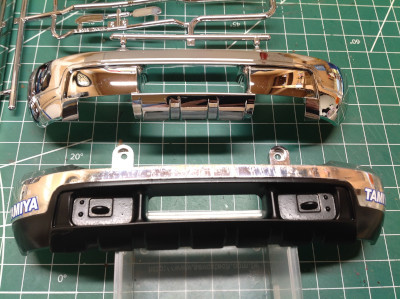
Because the Juggernaut 2 chrome is so scratched, I had originally intended to replace the bumpers and grille with new parts from the Highlift F-350 and had acquired the parts for that purpose. However, it turns out the parts are not the same. On the left you can see the grilles. The upper is from the Jugg, the lower is from the Highlift. Apart from the obvious fact that I haven't painted the bottom one, the distribution of light buckets is also different. There are even bigger differences in the front bumpers, shown on the right. The lower version from the Jugg has molded tow hooks. The upper version from the Highlift has cutouts for the brush guard. I decided to keep the original which I painted with semi-gloss black as shown. The rear bumpers seem to be identical, so painted and kept the original. 
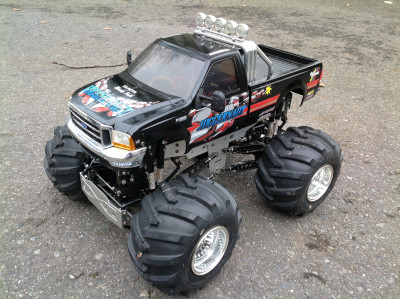
Even though this is a Juggernaut 2, I decided to paint it black like the original. The left shows the cab after the first coat of black. On the right the MCI reproduction decals have been applied with a few coats of clear over the top. I painted the mirrors flat black. 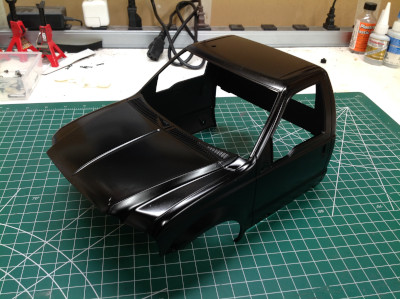
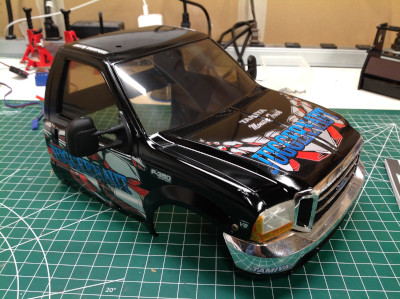
These images compare the truck as I received it to my completed Juggernaut restoration. I vastly prefer my version, but I suppose I'm a bit biased.
I thought it would also be interesting to compare the Juggernaut F-350 to the Highlift version which uses almost the same body. You have to look closely to see that the Highlift has much larger wheel arches to make room for the wheels to turn with the lower suspension. The arches are somewhat masked by the rubber flares I added. There are differences in the bumpers and grille as discussed earlier, and the Highlift version also has wipers. 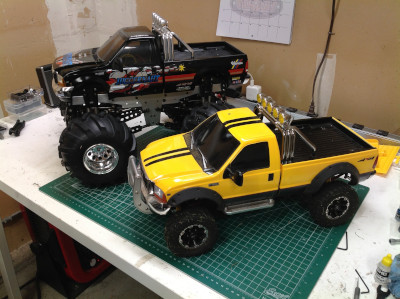
The following user(s) Liked this: stingray-63
|
|
|
Please Log in to join the conversation. |
Blakbird's 58256 Juggernaut 2 Build 3 years 11 months ago #59536
|
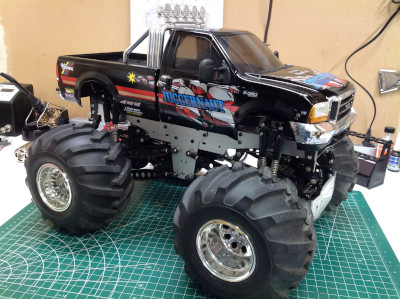
What makes the Juggernaut look so good? Is it the scale Ford F350 body? Is it the tires unique to this model? Is it the crazy suspension? It's probably a combination of all of those. I do think that the original Juggernaut livery is better looking that the Juggernaut 2 so that's how I decorated my model. Enjoy.


|
|
|
Please Log in to join the conversation. |
Blakbird's 58256 Juggernaut 2 Build 3 years 11 months ago #59537
|
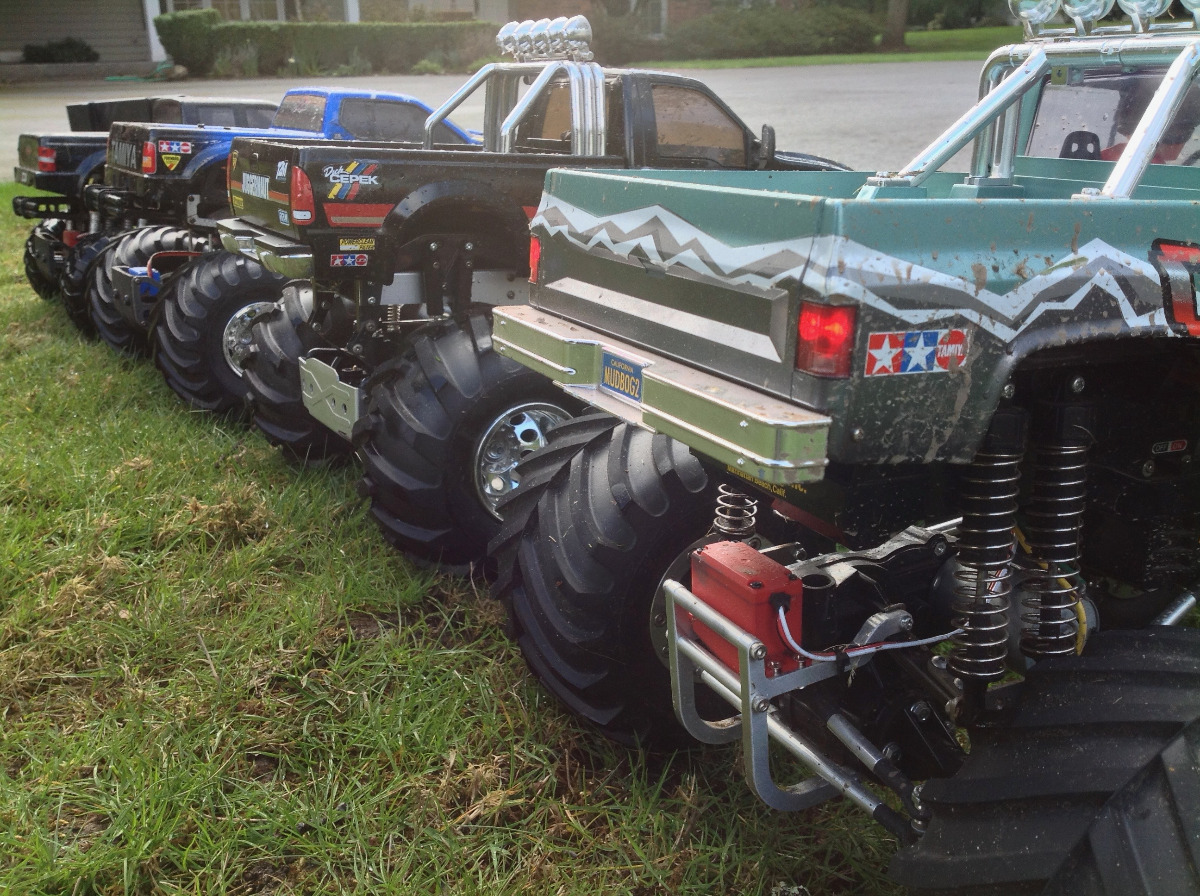
Here are a few bonus pictures of my whole Tamiya monster truck fleet.


The following user(s) Liked this: stingray-63
|
|
|
Please Log in to join the conversation. |
Blakbird's 58256 Juggernaut 2 Build 3 years 11 months ago #59543
|
I was sure that the grills were the same between the jugg and the hilift. Same for the main body.
|
|
Please Log in to join the conversation. |

Blakbird's 58256 Juggernaut 2 Build 3 years 11 months ago #59550
I thought the same thing. Turns out they are different. They are compatible so you could swap them and maybe no one would notice, but now I would. 
The following user(s) Liked this: stingray-63
|
|
|
Please Log in to join the conversation. |
Blakbird's 58256 Juggernaut 2 Build 3 years 11 months ago #59551
|
I like your writing, and I knew of the Juggernaut background and all. I believe this truck never got the recognition it deserved. Tamiya got this one out too late, by 1999 no competitive monster truck had the chassis frame and leaf suspension, but somehow they still made it that way, yeah go figure. I loved the truck, but could not afford it. I too believe the original version looks better. Also, I knew about the body differences with the F-350, but I think there is also a small difference between both Juggernaut bodies. If you have the chance to compare maybe you can confirm this?
One more thing, I think with certain orig parts you can always de-grade a TXT-1 to make a Juggernaut II. Am I wrong? Stay safe y'all and have a good weekend! ") |
|
Please Log in to join the conversation. |

Blakbird's 58256 Juggernaut 2 Build 3 years 11 months ago #59552
|
Out of all the Tamiya Monster trucks, The Juggernaut 2 is my Favorite and maybe on day I will eventually get one
") Nice restoration on this one Nice restoration on this one  If you can't fix it with a hammer, you've got an electrical problem mate
|
|
|
Please Log in to join the conversation. |

|
|
|
Time to create page: 0.259 seconds