Keyword

TOPIC:

2012 re-re Bruiser & HG P407 clone builds 11 years 11 months ago #9139

I was just looking at how far I'd got ... it's nice to have so much metal on a kit, but with all the different colour bits & all the nuts & bolts, it really looks like ... well, Meccano :sick:

The coolest kind of meccano there could possibly be though... B)

Please Log in to join the conversation.

Last edit: by Edou.

2012 re-re Bruiser & HG P407 clone builds 11 years 11 months ago #9142

Pah Meccano, how dare you! Do you honestly think this chassis looks like Dexion racking for 3-year olds? I think not... I sort of agree about the selection of different colours, but what do you think would look better? To be scale-looking, it'd all have to be brown & rusty (Have you ever seen a 4x4 that's clean n shiny, other than show trucks?), & all black or all silver doesn't look right to me (Black looks better than silver though).
Nice to see a kit close-up to see what Tamiya have been up to recently.
Are the chassis rails channel section steel? Are the diffs robbed from the Highlift/TLT? Good to see they've improved the way the knuckles are fixed on, the early Hilux is a bit of a shambles in this area. Distressed to see they've gone with flatted driveshafts for the drive output again, really, really bad idea....
Not sure what I think to the pole-like links to the rear axle, I know they were on the previous Bruiser (& Mounty?) but they're not present on the real thing, & why weren't they included on the Highlift?. I know WHY they're there, it's to stop axle rotation when giving it the beans, which leads to wrapping the leaf springs around the axle (As far as the sliding prop will allow) & wrecking them, like the Highlift does...
What sort of wheels/hubs/bearings do these have? - looking at the front knuckles it looks like they're gonna be skate bearings in the hubs, a'la vintage Hilux

Please Log in to join the conversation.

2012 re-re Bruiser & HG P407 clone builds 11 years 11 months ago #9144

eddrick - hubs are nothing special other than being cast metal instead of plastic ... the first one I picked up had "R" stamped on the back so I thought they must be handed, but they're not - all four are stamped "R" :whistle: 
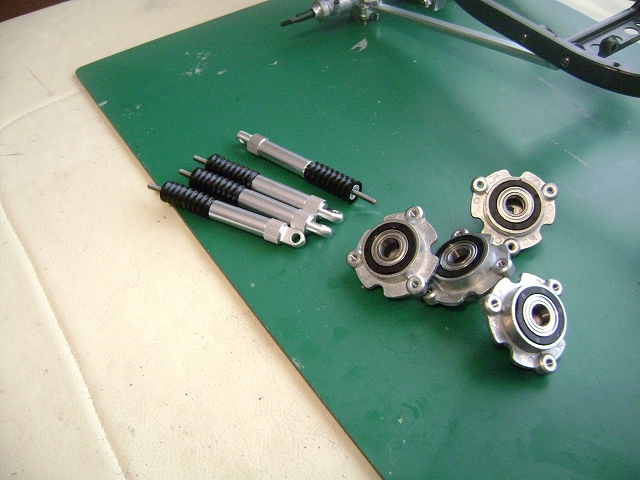
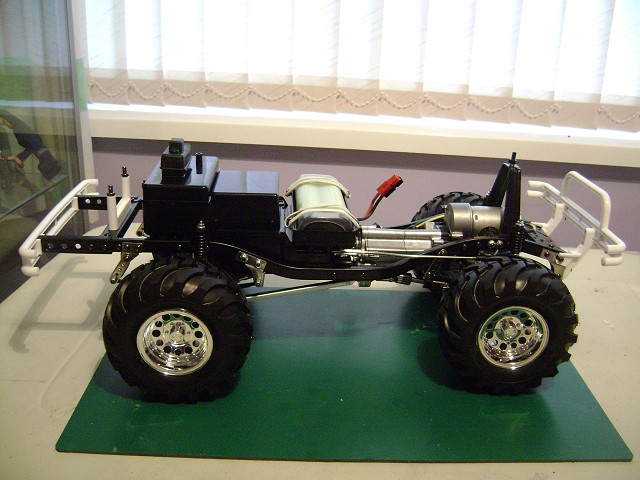
A 1680 bearing sits in a plastic spacer ... that's about it really ... wheels are also a little dissappointing - they're one piece, including the sticky out hub centre bit.

Re the chassis colours - I think all "silver" or preferably all "black" (or rather a mix of brown/blue from whatever pseudo-blueing process used) would have looked better - and also some uniformity in the fastener alignment ... I've been following the manual on the offchance there's some logic in it, but for the most part having the machine screw heads pretty much alternate with flange & lock nuts doesn't make sense, unless Tamiya _want_ you to notice them - it does rather shout "LOOK AT ALL MY FASTENERS! I'M MADE FROM LOTS OF PIECES OF METAL! FALL AT MY WHEELS AND WORSHIP, PEASANT!" :whistle:

The rear axle "poles" aren't held in by very much at all at the axle end, one of them already rattles :S

Please Log in to join the conversation.

2012 re-re Bruiser & HG P407 clone builds 11 years 11 months ago #9147

Manual page 10, steps 13-15: dampers & hubs:


Page 11, steps 16 & 17: fitting + underguard (the reason for the plain nuts on the inside front U-bolts becomes apparent):


Page 12, steps 18 & 19: starting on transmission case & main shaft:


The was a _really_ helpful note in the manual - "Use shims (BC 16 (0.5mm), BA19 (0.3mm)) for clearance adjustment"... well, duh! I know shims can be used to adjust the end float, but what is it _supposed_ to be?

I reckoned there was about 1mm extra float once the shaft was together, so put an extra 0.3mm shim between the two plastic gears & two more 0.6mm shims between the 1150 bearing in the 22T gear & the circlip on the "left" end - so now there's no extra float anywhere on the shaft & everything still turns freely ... it feels right but I have no idea if it's correct :unsure:
Attachments:

Please Log in to join the conversation.

2012 re-re Bruiser & HG P407 clone builds 11 years 11 months ago #9148

... & I did look at the Tamiya USA Bruiser build ( www.tamiyausa.c...cle-id=599 ) but there's no mention of shims :(

Please Log in to join the conversation.

2012 re-re Bruiser & HG P407 clone builds 11 years 11 months ago #9152

I think I got it right - I've finished & fitted the gearbox (fixed in 2nd gear ATM) & run it up - it was a little noisy & first until the grease got spread around, but it seems to have settled down without incident :)


Manual page 13, steps 20 & 21: shift rod/shift forks, "sub shaft" & fitting front transmission case:


Page 14, steps 22 & 23: planetary gear, spur gear & cover:


Page 15, steps 24 & 25: motor, prop shafts & temporarily fixing transmission in 2nd:


...

Please Log in to join the conversation.

2012 re-re Bruiser & HG P407 clone builds 11 years 11 months ago #9153

...

Manual page 16, steps 26 - 28: fitting transmission, radio check & fitting extension cables ... I think I see a slight problem with the battery extension lead :whistle:


Attachments:

Please Log in to join the conversation.

Last edit: by Jonny Retro.

2012 re-re Bruiser & HG P407 clone builds 11 years 11 months ago #9156

seems T replaced the skatebearings with smaller ones and a plastic ring, probably to save weight :P

nice keychain label, does it come with the car? :)

have you seen Wyomings all black frame on TC?

Please Log in to join the conversation.

2012 re-re Bruiser & HG P407 clone builds 11 years 11 months ago #9161

...

nice keychain label, does it come with the car? :)

...


No, but it would make more sense than that stupid brush :whistle: ;)

It's home-made (for personal use, not for profit, not for resale, etc - just wanted to make that clear :D) from a big box of keyring blanks

I have quite a lot of transmitters (30, I think) & it's difficult to keep track of what's set up for what & whether it has batteries in it, etc ... so now when I get a TX set up for a particular car (servo trims, direction, crystals) I put one keyring on it with a picture of the car/boxart & one indicating how good the batteries in it are - green for still good, yellow for just about ok ... there's no red tag as duff batteries get pulled out :)
Attachments:

Please Log in to join the conversation.

2012 re-re Bruiser & HG P407 clone builds 11 years 11 months ago #9167

Manual page 17, steps 29 & 20: installing servos, assembling servo savers & rods ...


Page 18, steps 31 & 32: installing servo savers & rod, top & bottom covers ...


Page 19, steps 33 & 34: attaching mechanism box & attaching shift rod... I have another idea for a bonus item - a double jointed spider monkey, because that's what you need to fit the 4 m3 screws & o rings ... pretty boneheaded bit of design if you ask me, 4 short lengths of studding & some flange nuts would make it so much easier :whistle:


Page 20 ... step 35 is just diagrams of what happens when you shift gear, step 36 is fitting doodads to hold the transmission in particular gears if you're only using a 2-channel set ...


Page 21, steps 37 & 38: fitting battery holder, body mounts & bumpers ...


Page 22, steps 39 - 41, assembling wheels + fitting, + fitting battery pack ...


I've had a quick play with the chassis, turning circle is not very impressive but it seems fairly torquey, 1st gear/4WD is very low, it's a bit disconcerting to hear the motor & transmission whirring flat out & see the thing moving slowly :D


I don't know when I'll get to the bodywork, it's been raining pretty much continuously here for 3 weeks now :S

Please Log in to join the conversation.

Moderators: caprinutstingray-63AndyAus
Time to create page: 0.201 seconds
Cookies are required to make this site work. If you continue to use this site you permit us to use cookies.