Keyword
  • Page:
  • 1

TOPIC:

Blakbird's 58346 Grasshopper Build 3 years 2 months ago #65160

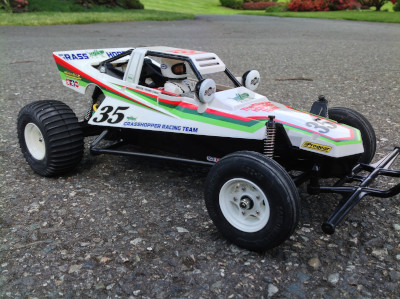
The 58043 Grasshopper came out in 1984 and, depending on how you define buggy, was really the second after The Frog of the previous year.  While The Frog was a somewhat deluxe version of a 2WD buggy, the Grasshopper was as basic as it gets.  Sporting a solid rear axle, a 380 motor, swing arm front suspension, and pogo stick shocks, it pretty much drove like the bouncy insect after which it was named.  Unlike many of Tamiya's earlier offerings which sported many metal parts, the Grasshopper is nearly entirely plastic right down to the gears.  It may not have been fancy, but it was cheap and a good starting point for scores of RC enthusiasts.  The Grasshopper was re-released in 2005 as kit 58346 with basically no changes from the original apart from the lack of a mechanical speed controller.  This is the version I built.

The Grasshopper is not good, but it was not intended to be.  While some racing buggies are described as though they handle like they are "on rails", the Grasshopper drives like it derailed and then fell off a cliff.  The suspension is so bad that it probably does more harm than good.  On asphalt it drives reasonably well, and it is acceptable on small gravel.  Anything else is too much.  Oddly though, it always puts a smile on my face.  You can't help but laugh at it as it bounces around the yard.

The box for the Grasshopper re-release looks just like the original apart from an update to the text on the stickers.  The inside of the box doesn't feature any blister packs, but the contents are still nicely arranged as you can see.
   

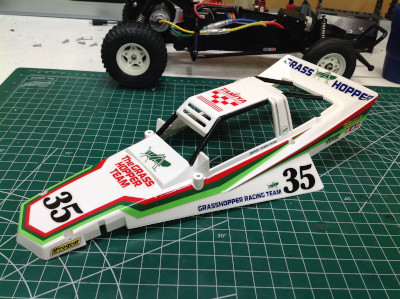
After knolling the contents it is pretty clear that this is a very simple kit.  There are only a handful of parts trees and only three hardware bags.  The picture on the right shows how almost the whole outline of the model can be seen with only two parts: the chassis tub and the body shell.  The hard plastic body is molded in white, but I'll be painting it anyway.
       

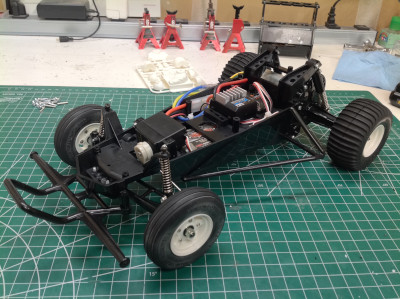
The gears in the Grasshopper are very large, much larger than needed to react the torque of the tiny 380 motor.  The brass hex shown on the left grips the inside of the differential output gear.  The differential spider gears are supported within a spur gear as shown on the right.  There is only one stage of gear reduction after the pinion:spur combination.
   

The gearbox is housed directly inside the solid rear axle.  Note how far beyond the bearings the axle shafts protrude.  The kit came with plastic bushings but I upgraded to rubber sealed ball bearings as usual.
Attachments:
The following user(s) Liked this: jord001

Please Log in to join the conversation.

Last edit: by blakbird.

Blakbird's 58346 Grasshopper Build 3 years 2 months ago #65161

The Grasshopper has always come with a smaller 380 sized motor instead of a standard 540 sized silver can, though the latter can be installed as an option.  The 10 tooth brass pinion is pressed onto the motor shaft and is not intended to be changed.  An adapter is used to attach the motor to the rear axle housing.  The adapter is omitted if a 540 sized motor is installed.
The solid axle connects to the chassis tub with a couple of bathtub fittings as shown.  These fittings have slots in them allowing the axle to translate up and down and pivot about a longitudinal axis (tip side to side), but the tab in the middle blocks the vertical motion and allows only rotation.  This keeps the suspension from squatting while accelerating.
The rear shocks have a lot of travel but are not filled with oil.  They don't even have internal friction, they are effectively just pogo sticks.  This makes for a lot of bouncing, but it is supposed to be a Grasshopper after all.
   

The steering system is very simple.  I used a cheap Futaba analog servo attached directly to the steering tie rods through a plastic servo saver.  The servo horn pokes down through a slot in the bottom of the chassis.
   
Attachments:
The following user(s) Liked this: jord001

Please Log in to join the conversation.

Last edit: by blakbird.

Blakbird's 58346 Grasshopper Build 3 years 2 months ago #65162

The marking on the chassis tub shows that this is still the same part that came with the original Grasshopper in 1984.  On the right you can see the chassis tub with all the electronics installed.  Since this buggy originally had an additional servo and a mechanical speed controller, there is a lot of extra space when using a modern ESC and receiver.  As far as I can tell, the absence of an MSC is the only change from the original version.
   
    
The front suspension uses a pair of wishbone shaped swing arms (no upper arm).  These install into slots in the chassis tub from below.  The pivot axes are slanted slightly outward as shown on the right.  The steering knuckles are plastic with a steel hub molded right into them.  It is not removable.
   
    
The front bumper is attached next followed by a brace which captures the front suspension arms.  On the right you can see the front shocks which are nothing more than bolts poking through the supports.  These stand even further above the supports when the suspension is compressed.
   
    
The Grasshopper uses 3-piece beadlock wheels in both the front and the rear (different sizes).  The tires are pretty stiff so these are not particularly easy to install.  The front tires are ribbed and the rear are paddled.
   
Attachments:
The following user(s) Liked this: jord001

Please Log in to join the conversation.

Last edit: by blakbird.

Blakbird's 58346 Grasshopper Build 3 years 2 months ago #65163

Here is the completed rolling chassis.  It only took a couple of hours to assemble.  The profile just screams classic buggy.
   

The body is not quite so easy to finish as just painting the whole thing white.  That's how it starts, but then the roll bars need to be painted black by hand.  After that I installed the stickers and then put a layer of clear over the top.
   
Attachments:
The following user(s) Liked this: jord001

Please Log in to join the conversation.

Last edit: by blakbird.

Blakbird's 58346 Grasshopper Build 3 years 2 months ago #65164

The Grasshopper isn't exactly a stunning example of Tamiya scale awesomeness, but it is a good looking buggy nonetheless and certainly has an iconic shape and livery.


Attachments:
The following user(s) Liked this: Edou, stingray-63, 1972 LeMansGT Jim, silvertriple, jord001

Please Log in to join the conversation.

Last edit: by blakbird.

Blakbird's 58346 Grasshopper Build 3 years 2 months ago #65165

  • Al
  • Al's Avatar
  • Offline
  • Hog Heaven
  • Hog Heaven
  • Posts: 1518
  • Likes received: 1792
Thanks Blakbird, great write up as usual.
I think Tamiya’s success with a car like the Grasshopper is that in terms of price it allowed a lot of people to get their first hobby grade rc car. You’d be looking at paying 2 or 3 times the cost of this for a serious car. And cheaper options would be RTR models by companies like Nikko.
My first rc car was a Nikko Golf gti followed by the Tamiya Sand Rover, which again like the Grasshopper was a great entry level car
and was probably half the price of a Rough Rider or Sand Scorcher.
The following user(s) Liked this: jord001

Please Log in to join the conversation.

Blakbird's 58346 Grasshopper Build 3 years 2 months ago #65166

Always a pleasure to read your build threads Blakbird !

Proud owner of the Bruiser Family
The following user(s) Liked this: jord001

Please Log in to join the conversation.

Last edit: by Manotas.

Blakbird's 58346 Grasshopper Build 3 years 2 months ago #65280

Nice write up.  I didn't realise they had a smaller motor. Never the less it was a good starter model. Never had one myself but had the hornet, lunchbox and falcon which were also pretty basic but all were fun which is the main thing. 
Regards

Lee

Please Log in to join the conversation.

  • Page:
  • 1
Moderators: caprinutstingray-63AndyAus
Time to create page: 0.405 seconds
Cookies are required to make this site work. If you continue to use this site you permit us to use cookies.