In the beginning there was once again the cutting, and views of the parts
The GFK-Chassie and Alu underbody protection, had deep scratches
Also at the front struts and the roll-over bar is not the time passed without a trace
I had two nights Ruminated what I wish to translate and what color it should be, because to get it could continue after this had been made
Since I am in tamiya PS-52 (candy lime green) just returned from my new favorite color that i found this of course had to be used.
It is precisely in the "old" three-piece rims it is helpful that you on part tree can be painted. Two layers and two layers of clear coat paint later saw the result looks like. Combined with new tires and rims bolted together using M2x10 V2A screws.
The GFK-Chassie was also with two layers and two layers of clear coat paint treated. The front struts refreshed, and then with a V2A screws and polished U-discs bolted together
The gear housing has been cleaned, with ball bearings and fitted with a V2A bolted together and with a tamiya Sport tuned engine fitted, the roll-over bar has been remodeled.
The Alu underbody protection has been polished, and then with the Chassie/gearbox bolted together.
Today I have made me remember to bring to the front axle to freshen up. Everything has been spruced up and once again with V2A bolted together.
The revised suspension of the rear axle
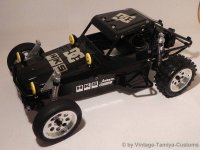
Ready assembled
Try out time with tires
The front axle has new dampers to get
The rear bumper is painted, with V2A screwed and the dampers have found their place.
Try hitting times with the body
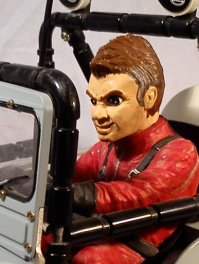
I have time to the driver, only made assembled and sanded..
... Then came the color.
Today, after consideration and research the chassis reconsidered (as the native bugs in the Baja had) rear axle swing modified, drive-kardans polished and mounted away,torsion bar springs and dampers with feathers stocked and adapted in the length.
Front axle also rebuilt
It went to's Body-Work corporate volunteering, solar roof and gluing, screwing and gluing nose, down cutting of the wings
Links worked,right orginal
At the rear, the engine cover a good walk away and the wings cut down.
Times with its lid
Contemplator of the body/steering holder has been spruced up, and the new RC-box mounted
After a long wait finally met today the new front wheels and tires
These have been painted immediately ...
...mounted...
...And cultivated. In addition, the steering servo taken place
The "clear" could finally be mounted engine cover (since I finally had to get)
The spur gear/pinion has taken place and also this coverage could be mounted
The now finished Chassie

After a long time and consider it to me because mom but not like that, there is now but not the extreme cut body to use but a normal
The new beauty
:wink:
Bonded roof
The "window" of the rear window rubber, as well as the engine bracket have been removed
As well as the rubber of the side windows
The second page also removed
And also of the windscreens rubber has been removed
The "old" holes for the body holder were using small chips closed (via hole iron from ABS) and the first primer layer was applied (for better detection what everything must be sanded)
Short seat tests on the Chassie
The front has now been tidy bolted together and then glued together, after drying of the adhesive has been started with the loops so i know where spatula applied must be
By the syringes of the body resulting burrs on the front and rear fenders have been removed
The roof was also sanded
Then I made the wings "gently" a bit in the form to bring to
And also the tail was still in its final form (links orginal, right circumcised)
The new bumper could be mounted on the Chassie
In the body have been processed the wings on both sides equal
Also at the rear, the wings were adjusted, as well as the holes for the rear body mounting drilled.
It was then sanded to a lot of the body to give their final look behind body attachment has been mounted to the sample, and mounted on the body.


")


")