I am in the August 2010 by much chance and good luck to the Avante has come, unfortunately not nearly completely, but there were a few parts that were in a very good condition.
I have some time considering what i would like to improve/change everything and am finally came to the conclusion that a discreet blue TRF theme perfectly to the Avante had to fit.
With the rear transmission has been started, after a thorough cleaning (with the fortunately no defects to find everything with new ball bearings were) was stocked
[/url]
The engine/transmission plate i went so well it polished, a few deep scratches were, however, not more out to get to (these are but fortunately not visible bodies at some later date)
Then everything was bolted together with V2A screws and blue slices
Now the transmission housing could again be fitted
By looking for something, I am then in Italy to ovp joint cups come
What then could be used also equal
The lower deck (of the twin deck Chassies) was cleaned and the Chassie post was mounted
The rear gearbox was fitted with the 3 screw posts (these are included in the metal bag i could get in England)
Lower Deck and rear transmission could now be screwed
After a few weeks and some search i was rewarded with a buttery piece for my efforts.
A new RX-540 VZ Technigold engine
The motor plate was also so good it went to high gloss and with the engine bolted brought
After the assembly of the pinion, he could be bolted to the gearbox
With the front gearbox it went on. After the cleaning was followed by the re-assembly and the mounting with new ball bearings
Inbetween the cardan shaft has been spruced up
Then the front gearbox was mounted
The front gearbox has also not yet blue glands receive
With the upper deck of the Chassies it went on, also here was only cleaned. Then the brass terminal screw from the bottom (of course blue)
Subsequently, the mounting posts of the servos mounted
The upper deck could now be mounted
The battery support fits was appropriate
As well as the Stiffening bridge on the front axle
With V2A has been bolted again
From the aluminum parts trimmed the i have found in England, as well as a new e-parts tree from Austria, was manufactured the steering
This could then also made inroads into the Chassie take
The rear dampers bridges make procurement technically a real problem, nevertheless, i would in Austria but then find it. Here was also cleaned and refreshed ...
...Then she was mounted
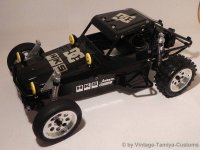
It already looks a little different from the original?
Behind the stabilizer velvet holder (from England) were mounted ...
... This was the spoiler holder mounted
With the rear bumper was bolted everything
With the backside suspension it went on. The plastic parts have been found in the USA
The rear hub carriers i wanted not from plastic, it should be what technically/visually nice, so there were aluminum parts
With the screws bag from England could then be assembled
The entire suspension of the Avante is based on this giant ball heads, the partially almost in gold will be offset by...
In Austria i could then at least 11 (of a total of 16 units) get optically (not the most beautiful but functional)
Then the ball heads have been cleaned and polished up ...
... Then assembled
Original was only the front axle shafts equipped with CVD, but i found by luck two couple CVD waves in England and could now also the rear axle with these mounting
With the new ball bearings, the CVD waves mounted and fitted with new hexagonal cleats
The other parts the spoiler keeper ...
... were bolted together ...
... And, together with the rear suspension on the Chassie attached
In the parts box then i am still on blue Servo holder made of aluminum and a new servo stumbled.
The most suitable servo-saver velvet linkage was also quickly found
This was followed by the assembly of/in the Chassie
At the front next it went on, the plastic parts come back from the usa
The rare c-hubs in cast aluminum i've found in Austria
The steering lever should also be non-plastic on the front axle, in consequence, it was again aluminum
In the first step, steering lever and c-hub connected to each other ...
... Then with the suspension
Here comes the second couple Cvd's return to the game
After unpacking and the mounting with ball bearings have been used the waves
The stabilizer holder for the front axle (from England) ...
... have been purified and polished ball heads mounted. Then it was still a bit in the TRF look ,blue
From M4 V2A screws i've made the set screws for the suspension
Then again were cleaned and polished ball heads. The set screws were then secured with Loctite
Then the E2 parts with Loctite secured. These are now also made of aluminum
Then it went to the assembly. The joint Cup was taken
With this Pin's will be the links attached with an E-clip will be backed up
On the other side was followed by the same game
The installation of the front axle stand next to the program. These are the already mentioned rocker arms, connected by a short piece rubber hoses are you "Springy" is stored in a frontal chrash had to give way to the suspension and to the rear swing
The appropriate quantity of a rubber hose (not too hard, not too soft, matching color) must I still find. So long I have the rocker arms with a little heat shrinkable tube fixed
So you could then be assembled
The left suspension was mounted. The previously manufactured links have been established
With Pin's will be here again everything connected
The drive shaft was used in the joint Cup and the suspension on the rocker arm mounted
On the other side, the Assembly also done
It was still a little blue alloy added
Main view
The new spoiler was made ready
After the cutting and drilling ...
...It was mounted
The new body is also prepared
There were again set screws from V2A produced, but this time for the rear axle. The E3 parts were also (such as the E2 parts on the front axle) of alloy were installed. Also again were cleaned and polished ball heads
Then, the Links here too, once again mounted to the Chassie (the screw is not the original part and serves only as a placeholder because I still have the parts on the lathe finished must)
As with the front axle will be here again with Pin's secured
The suspension has been joined together with the Link
Then using pin secured
Then, I have me time (ovp) dedicated to the tires
The ovp rims/attachments i can find again in England
Ready assembled
The parts of the wheel mounting (in principle oversized wheel nuts with fuse. These are without tools to be stripped)
The parts of a mounting
Ready assembled
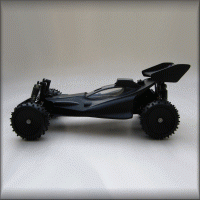
It then continued with the body. After drilling the holes in the radii ...
... She was completely trimmed
Interest from the Chassie times with mounted wheels/body
Today, at last, a awaited packet, the long-awaited dampers
Unfortunately only half complete, since without spring cap and ball pans, but there will find what
")
The dampers were good risks from the former owner, unfortunately has suffered very thereby the gold coating
Look at the worst dampers caps
Out of interest i've made time a damper (cleaning and ent anodising i must anyway, no matter what now comes)
Dampers cleaned
The Gold was removed
The result after 5 min polishing (not finished)
It went back a little further. The front axle has your steering linkage to get blue (of course)
Meanwhile, i could also the needed rubber for the rocker arms of the front axle grabbing ...
... And of course mount
In the normal driving remains the front axle where it is, in a Chrash you can now but a little to the rear dodge
The tires could also be dismantled once again because they are also the original deposits have arrived
The attachment of the dampers has me some time a little headache since orginal a double ball-head (1x5mm and 1x6mm) is used to get this but almost not to be. I therefore decided to do so after an inspiration to execute the attachment blue
The Parts
The fastening screws with washers was mounted
The 6mm ball was turned up (to illustrate here times with a damper housing) and with the O-ring somewhat fixed
It was then the 5mm ball mounted
Here both sides with and without dampers
The transverse struts of the dampers bridges was also produced
Here mounted on the front axle
The damper mounting of the rear axle has been realized in the same way
After a bit of past time, a little bit of patience and also again by luck I am still in a complete set ball heads (16 units) has come. Since i wanted to try it again what I did so you cut and blue anodized
A few impressions in assembled condition
It went back a little further (every little helps)
The remaining ball heads of the front axle was exchanged against the blue
Also, the still missing threaded rods from V2A screws produced
The now fully-equipped front axle in detail


")
")