TOPIC:
Blakbird's 56013 M4 Sherman Build 2 years 3 months ago #70290
|
A Bit of Tamiya Tank History
Many Tamiya fans believe that the first Tamiya RC was the 58001 Porsche 934 Turbo RSR. While that was indeed the first RC car, the first Tamiya RC of all was the 56001 M4 Sherman tank model two years earlier in 1974 (it was called RT-1601 at the time). The model was designed by Dr. Fumito Taki who had recently transferred from the accounting department. The original idea was to use the German Maus tank as the subject, but they soon learned that due to the tank geometry it wouldn't turn well and the tracks would easily get clogged with debris. They needed something short and driven by the front sprockets which gripped the tracks at the outer edge. This made the M4 Sherman the only viable option. The other advantage of the Sherman was that some uncommon versions used a 105mm howitzer instead of the standard 75mm cannon, and this short barrel would be less likely to hit obstacles, making it more suitable for a running model. So Dr. Taki headed off to the garrison at Higashifuji to measure the real thing for a scale model. After making a few mockups from wood and clay, he proceeded with the gearbox. In these earliest days of RC, proportional controllers scarcely even existed. For that reason, the original Sherman tank was basically a static model with a gearbox that could be built using 0-2 channels. The gearbox had two sides like a skid steer which could be connected independently to two 360 sized motors or connected in parallel sharing a single spur gear. Each gearbox side had a clutch at the forward end which was spring loaded to grip the input gear. However, if the front of the clutch housing were pushed forward it would gradually release the input gear and connect to ground instead. In the simplest setup, the motors were just connected in parallel with no RC at all. The model could simply be turned on and off and would drive forward when on. Because the left and right sides were hard coupled together, it would drive straight. The one channel version was intended to use the old controllers with one toggle button. In this configuration the motors were connected to each side separately. It would drive straight forward until the button was pushed which would simply disengage the left hand motor causing a turn. Stopping, turning right, and going backward were not possible. Even the most deluxe configuration was still very electronically simple (but mechanically complex). A proportional servo was used for steering. It was connected to a wide crank which could contact either clutch, so by rotating the servo either side was gradually disengaged and then grounded. This allowed proportional turns all the way to stopping one track. Pivot turning was not possible. Incidentally, many early tanks used a similar clutch and brake turning system. The prototype gearbox was made by Dr. Taki himself on a lathe. It worked perfectly and even allowed him to attempt a version with a water cooled engine. There were no speed controllers yet, not even mechanical, so there was no proportional throttle. Instead, another servo just contacted either a forward or reverse switch. This means the model could be stopped, full forward, or full reverse. This was the full extent of the controllability. No remote control of the turret or barrel was possible. In terms of scale realism, the real 105mm didn't have powered turret traverse or elevation, so the lack of these features on the model is actually correct. Tamiya made three more RC tanks over the next few years (Leopard A4, Flakpanzer Gepard, and King Tiger) which each progressed a bit in terms of technology. The Leopard used the same gearbox but switched to a single 540 motor. The Gepard used the same thing but added a proportional mechanical speed controller and an optional 3rd channel with it's own battery that rotated the turret, elevated the guns, and rotated the search radar all at the same time. The Tiger used a modified version of the same gearbox, a rotating turret, and a strobing light in the barrel. This 4-channel version was the most deluxe tank of that original generation. Then things went quiet for 18 years! In 1998 Tamiya finally came out with a "new" tank, and for this new generation the M4 Sherman was the first choice again. Outwardly this new 56005 Sherman was indistinguishable from the original, using all the same plastic body parts and suspension. Inside, however, everything was different. A pair of new gearboxes using 380 motors was introduced. These gearboxes lasted a long time. They were used in new tank models up until 2016 and are all still sold today. The real revolution though was the DMD (Dual Motor Differential), a twin motor electronic speed control box. Using this controller, power to each gearbox could be modulated separately. The transmitter signals were mixed inside the DMD allowing the driver to use standard throttle and steering controls instead of skid steer. It was still a 2-channel model though with no turret control. There were only two models in this second generation before the next leap forward. The next thing Dr. Taki wanted to do was add sound. He originally intended to just add sound to the existing King Tiger to improve sales, but Tamiya's boss suggested doing something totally new. The Tiger I in 2000 added a Multi-function Unit (MF-01) to the DMD. Not only did this add two more proportional channels for turret rotation and gun elevation, it also added sound effects, lighting, gun recoil, and muzzle flash. Every 1/16 Tamiya tank since then has used a variation of this system. The sounds were recorded from a real Tiger tank by an employee on a trip to the toy fair in Nuremberg who was asked to take a side trip to the Saumur Museum in France to record the sounds. Amazingly, they were willing to start it up for him and let him record the sounds! It was only a year later (2001) when the Sherman came back for its third and ultimate configuration. This is like the Special Editions of the Star Wars movies. It is the version that Dr. Taki always wanted to make but didn't have the technology at the time. The 56014 Sherman used the same body and gearboxes as the 2nd generation, but added all the new sound and turret functions. This is the version I have. The Tamiya M4 Sherman 105mm Howitzer This particular version of the M4 Sherman selected is pretty unusual. The M4 was made in at least 19 different versions over a period of just two years. The Tamiya version is recognizable by the combination of the 105mm howitzer, the HVSS (Horizontal Volute Suspension System), and the radial engine. 841 out of a total of almost 50,000 were made in this configuration at the Detroit Tank Arsenal. So what does "Horizontal Volute" mean? This refers to the springs used in the suspension. Most suspension uses coil springs but these have some big disadvantages for tanks. Because of the weight a very large wire diameter is needed which means the solid height of the spring is very tall and therefore the suspension has hardly any travel. A volute spring is made in a tapered spiral out of wound rectangular bar stock. Because it is tapered, it nests when compressed and has much more travel. Most M4s were made with the volute springs arranged vertically, but a few later models used horizontal springs connected to pivoting bogies mounted in pairs. The system used in the model is made to represent HVSS although it actually uses coil springs hidden inside cans to simulate volute springs. Early versions of the M4 Sherman used a 75mm cannon which was later upgraded to a higher velocity 76mm version. Even less common were the versions armed with a 105mm howitzer which was really intended for use against infantry rather than other tanks. The model uses the 105mm version for the reliability of the short barrel in an RC application. There were also a wide range of engines used in the M4 Sherman. The model represents a version using a 15.98 liter 9-cylinder radial engine from Wright Aeronautical. The distinctive sound of this engine was recorded for the model. The sound is contained in the MF-02 unit which is unique to this model. The DMD T-05 is also unique to this model. There were also variations of the Sherman in different combinations of cast and welded hulls. The square sides of the model represent the welded hull version. The kit was available in two versions, one with a radio and one without. By the time I was looking, I could only find one so I ended up with a 27MHz AM radio I will never use. It was still worth it. This tank is awesome. It turned out to be everything I hoped. I don't know how they can make it better, so I'm betting against a fourth version. Everything can be controlled remotely using only a 4 channel transmitter. Remote functions include throttle, steering, turret rotation, gun elevation, main gun firing, machine gun firing, and turning lights on and off. Most functions are accompanied by sounds which are automatic. Speed and power is good despite the small motors. Like almost all of the Tamiya tanks, the Sherman comes with deluxe packaging. The outer panel is actually a pretty plain olive drab, perhaps to discourage theft. Once you open up that flap though, you see a huge piece of art work, a full list of features, and a bunch of windows highlighting some of the parts. 

The picture on the left shows the main display highlighting the tracks, the electronics, the speaker, and the gearboxes in clear windows. There are also photos and descriptions of most of the primary technical features of the model. The picture on the right shows the inside with the box top removed. Here you can also see the metal sprockets and suspension arms as well as the main hull piece. 

To my surprise, there was a full 27 MHz AM radio system and 7.2V Ni-Cd battery hiding under the metal parts blister pack. I didn't intend to buy the version with a radio, but that's what I could find when I was looking. Note that this is only a 2 channel radio, but all functions are actually controllable with only 2 channels, albeit with a more clunky interface than when using 4 channels. I will not be using this radio for obvious reasons and will probably sell it to a vintage collector. On the right you can see the large speaker box. This is actually quite heavy implying that the speaker has a decent sized magnet on it which will be a good thing for projecting the engine sounds. 

Here are the electronic units which are the heart of the model. The DMD (Dual Motor Differential) is essentially a 4-channel ESC (Electronic Speed Controller). The 2 main channels are 20 Amps each and control the dual 380 drive motors. The DMD mixes the driver's throttle and steering commands to control the independent track motors. There are essentially 3 modes. At very low throttle, a steering input causes the motors to run in opposite directions resulting in a pivot turn. At moderate to full throttle, moderate steering input is mixed allowing gradual turns at variable radii. At full steering input one side is locked allowing a sharp turn. High speed pivot turns are therefore not possible which is probably a good thing. The remaining 2 channels are 2.5 Amps and drive the turret motor and elevation motor. The DMD T-01 was released in 1998, but in 2001 the T-05 was already in use. The T-01 only supported 2 channels, but the T-03 already supported 4. There is no other obvious difference between them. The MF-02 (Multi Function Unit) controls the engine sounds, lights, and has a high voltage output for the muzzle flash. The MF-02 is unique to this model because it uses the radial engine sounds. 

Attachments: |
|
|
Please Log in to join the conversation.
Last edit: by blakbird.
|

Blakbird's 56013 M4 Sherman Build 2 years 3 months ago #70291
|
The 56005 Sherman was the first to use these gearboxes which were carried forward for the 56013 release. These come assembled and ready to use, but that did not stop me from tearing them down to figure out how they work. Note that the left and right gear trains are the same, but the motor placement is different. This allows them to overlap for minimum space consumption in the model. That black lever you see on top of the gearbox is used to engage an optional gear ratio, but that optional ratio is locked out by spacers in this model.

The path through the gearbox is convoluted to say the least. The photo at the left is my attempt at a torque diagram showing the path of torque through the gearbox. The table at right is the result of my teardown of the entire gearbox and painstaking counting of all the teeth. We start with a tiny 10 tooth pinion and then pass through 8 gear stages. Note that the final stage is actually a speed increase which is a very strange thing to do since it cancels out some of the previous reduction and adds additional inefficiency. It seems to have been done purely for spatial purposes. That penultimate gear diameter was needed to reach the output shaft. The result is effectively a 60:1 gearbox. In the event the optional gear ratio could be used, the 4th gear set ratio would change to 2.06:1 (35:17 instead of 32:20) and the final drive would change to approximately 77:1. 

I did the same exercise on the much simpler turret rotation gearbox. We begin with a worm drive from the motor which results in a huge gear reduction as well as preventing backdriving. The final ratio is almost 3000:1. I did a little quick math on this assuming a motor speed of 18,000 rpm which results in 360 degree turret rotation in about 9 seconds. This seems like a very scale accurate speed. A close look at the last gear stage at the top left of the left image reveals a ratcheting clutch which prevents breaking anything if the turret rotation is blocked. 

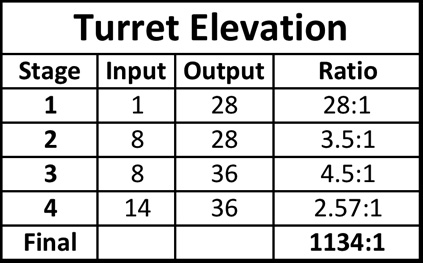
Finally, here is the same analysis for the elevation gearbox which is very similar using the same motor and worm gear. The final ratio is about 1100:1. Note that this output only ever moves a couple of degrees to lift and depress the barrel. The total elevation above level available on the model is not very much and is probably based on a tank with a scale 75mm gun. The 105mm howitzer was capable of elevating much higher (35 deg) which the model does not replicate. 
Attachments: |
|
|
Please Log in to join the conversation.
Last edit: by blakbird.
|
Blakbird's 56013 M4 Sherman Build 2 years 3 months ago #70292
|
At this point I had to hook up the entire electronics package and try everything out. The sound of the startup of that radial engine is really impressive. From what I can tell, the main headlights and tail lights are actually incandescent bulbs, but the machine gun uses an LED. 2001 was early for LEDs. The muzzle flash is some sort of high voltage neon. It is very bright and illuminates very briefly. You can hear the high pitched whine of it recharging after firing.

This is a relatively small number of plastic parts compared to the Leopard 2A6 which I had built previously, but still vastly more than any regular RC vehicle. This is really a plastic model kit sitting on top of an RC platform. Almost all of these parts are common to the original model from 1974. 
And here I've unpacked all of the hardware and am ready to start building. Let's go! 
Attachments: |
|
|
Please Log in to join the conversation.
Last edit: by blakbird.
|
Blakbird's 56013 M4 Sherman Build 2 years 3 months ago #70296
|
Excellent write up as always  ") However ... ") LEDs have been available commercially since the late 1960s, but came in two flavours - yellowy green, and orangey red. They were comparatively expensive, so only got used where the cost as a proportion wasn't so much of a factor (very early electronic calculators, large scientific instruments), where it would be a real problem to have a bulb blow, and where you didn't need very many of them. LEDs have been available commercially since the late 1960s, but came in two flavours - yellowy green, and orangey red. They were comparatively expensive, so only got used where the cost as a proportion wasn't so much of a factor (very early electronic calculators, large scientific instruments), where it would be a real problem to have a bulb blow, and where you didn't need very many of them.The LED in that kit I would say is there for performance reasons - you can flash an LED like that for far longer than you could a a grain of wheat bulb, it'd be brighter, and almost the right sort of colour too. For modern LEDs - superbright, long life, wide range of much purer colours including "proper" white and blue, and cheap, you'd be right - from an average, man in the street point of view, where LEDs weren't mainstream until 2010 or so ... Every man & his whippet has been researching, making machines for making LEDs & manufacturing LEDs themselves & I can only speak from my experience in one corner of that (University of Cambridge, Thomas Swan Scientific Instruments, Aixtron, 2004-2010/11), but by the start of that, LED manufacture using 2 plenum reaction chambers was not only well underway, an arms race as to how many 2" wafers you could process from at the same time was well underway, going from 3 to 9 to 19 in very short order. I can't remember exactly how many LEDs you get off one 2" wafer, but it's somewhere between 10,000 & 100,000. Before that, you could have LEDs with most of the "modern" properties - except cheap. I remember huge LED displays from 2000/2001, a dead end commercially I think, due to the long viewing distance required to look like a proper TV, rather than a Christmas tree, but quite impressive in a "wow, you expended how much money and effort on making something worse than the current products, but with new, underdeveloped technology?" kind of way. I don't think it was that long before small scale/research level production was happening with 3-plenum reaction chambers (2006/7), and the wafer count on commercial machines had gone up to 30 x 2" by the time I was no longer involved (2010/11). IIRC going bigger (6", or 8") wafers was going to be the next big thing (2012/13), due to having proportionally less wastage from exclusion zone around the edge, but I wouldn't know if that ever happened, or what the state of the art is now. ")
The following user(s) Liked this: stingray-63
|
|
Please Log in to join the conversation. |

Blakbird's 56013 M4 Sherman Build 2 years 3 months ago #70301
|
The sherman is one of my favourite tank. My dad bought one of the last version with the dmd. I don't remind if he has a 2 or 4 ways radio set inside. All I know is that he bought a futaba for it and the mixed functions are very complexes to light and firing. He has the king tiger full options to and this one is awesome.
The following user(s) Liked this: Al
|
|
Please Log in to join the conversation. |

Blakbird's 56013 M4 Sherman Build 2 years 3 months ago #70311
You can run this one with either a 2 or 4 channel radio and still get all the functions. It is interesting to see how they managed that. With 2 channels, you can only rotate the turret while stopped, for example, and quick movements of the sticks perform different operations than slow movements. When using 4 channels, things are a bit more straightforward but you still need to use trims to fire the guns and turn on the lights like the other DMD controlled models. The tractor trucks work the same way. I have the King Tiger standing by but haven't built it yet. Tanks are a whole other world of Tamiya. Sometimes I am in the mood, and sometimes I am not.
The following user(s) Liked this: stingray-63
|
|
|
Please Log in to join the conversation. |
Blakbird's 56013 M4 Sherman Build 2 years 3 months ago #70316
|
I never personaly built a tank but I built the aeromax with the first light system and it was amazing . I refound a little this spirit with the hilift and the old 3 speeds.
|
|
Please Log in to join the conversation. |
Blakbird's 56013 M4 Sherman Build 2 years 3 months ago #70318
|
The build starts with the main hull structure which is a piece of bent, formed, drilled, and tapped aluminum sheet metal (1mm). The picture on the right shows the main road wheel support brackets installed. These appear to be aluminum castings. The idler bracket is also metal, but the idler wheels are plastic. These parts appear to be common to the original 58001 Sherman, but unlike that model they come pre-assembled here. I assume that is to avoid getting glue into the bearings when installing the metal hub cap which would have been a real danger building the original.


Here is some very specialized hardware that can't be easily replaced with a bolt from the local hardware store. These stepped, threaded steel axles with flats support the road wheels. An exploded view and completed assembly are shown on the right. The kit uses bronze bushings rather than bearings in most locations which is probably fine for something that will not move around that much. You would need many dozens of bearings to do a conversion. The axle shafts pass through the hull and are secured with nuts. 

Here is a selection (left) of the two sizes of return rollers with the bushings installed. On the right you can see these added to the hull. Note that I've also added the rubber wheels to the idlers. The road wheels will also get rubber tires, but the return rollers just get painted to look like rubber on the outer rim. 

Attachments: |
|
|
Please Log in to join the conversation.
Last edit: by blakbird.
|
Blakbird's 56013 M4 Sherman Build 2 years 3 months ago #70319
|
Here is the pile of parts (left) which make up the simulated horizontal volute suspension. There are no real volute springs in the model, instead there are regular coil springs which sit inside cylindrical cans. These do a pretty good job of looking like volutes. The metal dampers on the far left are just for show; they offer no damping on the model. On the right you can see how the six suspension trucks are assembled (exploded view far lower right). Each truck has four wheels assembled in pairs attached to arms which pivot on the gudgeons attached to the hull.


These pictures show the completed suspension. Each truck can rotate as a unit pushing one wheel pair up while another comes down without any shock compression at all. If both wheel pairs attached to a truck are pushed up at the same time then the spring and damper compress. The little boxes attached to each damper probably simulate fluid reservoirs. 

Attachments: |
|
|
Please Log in to join the conversation.
Last edit: by blakbird.
|
Blakbird's 56013 M4 Sherman Build 2 years 3 months ago #70320
|
Don't ohmit to paint before the last building.
The following user(s) Liked this: 1972 LeMansGT Jim, jord001
|
|
Please Log in to join the conversation. |
Time to create page: 0.201 seconds