Keyword
  • Page:
  • 1
  • 2

TOPIC:

Blakbird's 56003 Flakpanzer Gepard Build 1 year 11 months ago #71248

This is the motor used to drive the rear mounted search radar.  It has 3 stages of reduction: one at the motor pinion, another at a right angle into the radar housing, and a final large reduction using a worm gear.  The radar dish itself is only pressed lightly onto the final shaft so it can slip if it becomes blocked.  This motor was intended to run on only 3V from a pair of C batteries, but even so it rotates very quickly.  At first I thought it was way too fast for scale, but then I saw some videos of the real thing which rotates at about 60 rpm.
      
 
Here is the MPDR-12 Doppler search radar which is used to acquire targets.  It may look like only a couple of parts, but there are 13 parts here even before the mechanism for turning the radar.
   
 
 The picture on the left shown how the motor drive system for the search radar is installed into the hatch on the rear of the turret.  On the right you can see the hatch installed onto the turret.  Note that the radar can fold down to lower the profile of the vehicle for transport.  It raises when in use.  This rotation is purely manual in the model; no motorization.  This rear hatch is hinged so it can be opened to maintain the mechanism.
   
Attachments:
The following user(s) Liked this: stingray-63

Please Log in to join the conversation.

Last edit: by blakbird.

Blakbird's 56003 Flakpanzer Gepard Build 1 year 11 months ago #71249

This little brush system is intended to allow power to pass from the hull to the turret without tangling any wires, thus allowing 360 degree rotation.  In practice, it didn't quite work out.  The white wire has to be sandwiched between a plastic shaft and a metal collar, but there is no slot for the wire so it ends up getting pinched very tightly.  After only a short while, my wire severed.  It can never be reattached because the collar can't be removed without destroying the part.  Luckily, I was already planning to use a speed controlled electrical system for the turret anyway or I would have been very upset about this failure.  The picture on the right shows the many stages of reduction between the motor and the output.  The initial stages are plastic because the torque is low, but the final stages are metal.
  

The picture on the left shows the turret traverse mechanism.  The motor is protruding at the upper right and it drives the crank at the upper center.  At the same time, it drives the crank at the lower left at a 1:1 rotation with the turret.  The little tab on the crank serves to lift the barrels up as the turret rotates.  The barrel elevation cannot be controlled independently.  The picture on the right shows this system installed into the turret.  The turret and radar are wired together on the same circuit so they move together, thus requiring only 3 channels to operate the model.
   

The picture on the left is one of the Oerlikon 35mm cannons which consists of 22 parts, some of them very tiny.  The guns press onto the elevation shaft with a friction fit rubber washer which makes them a bit wobbly but easy to adjust and/or remove.  The picture on the left is the tracking radar which is gimballed on two axes (no motorization, manual elevation and azimuth).
   
Attachments:
The following user(s) Liked this: stingray-63

Please Log in to join the conversation.

Blakbird's 56003 Flakpanzer Gepard Build 1 year 11 months ago #71250

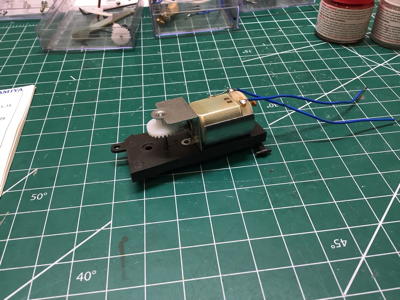
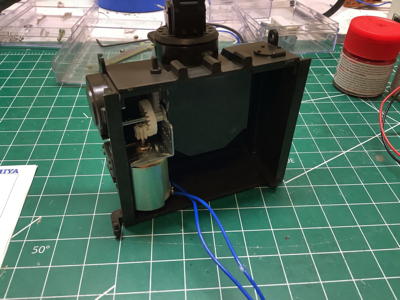
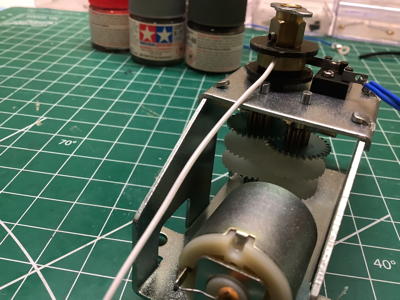
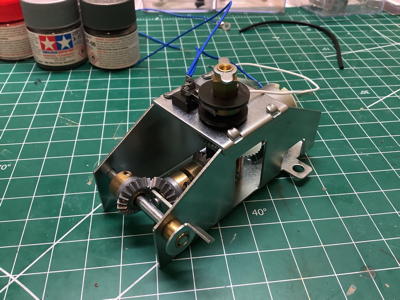
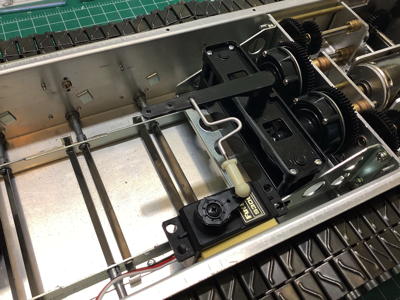
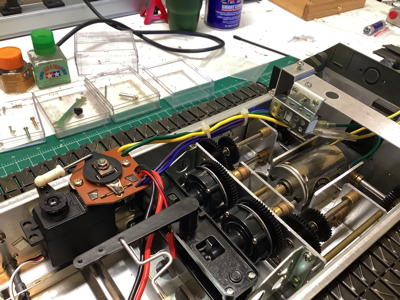
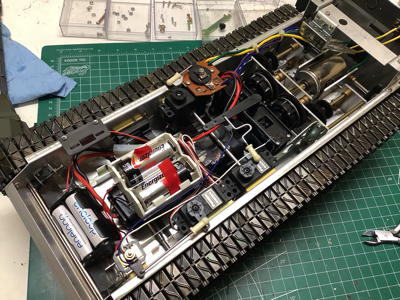
The electrical system for this old model is a lot more complicated than you might think.  The mechanical speed controller was connected to a 7.2V Ni-Cd battery on my version, though the original used a 6V lead acid battery.  The 3 servos and radio system were powered by 4-AA batteries at 4.8-6V.  Finally, the turret motors were driven by a separate set of 2-C batteries for 3V.  On the left you can see the steering servo attached to the side of the chassis with foam tape.  This turned out to be a problem.  On the right you can see the mechanical speed controller driven by another servo.  Note that this 3-speed forward and reverse MSC is different than the continuous brushed MSC in the original release.  You can see the resistor on the far right above the motor.
     

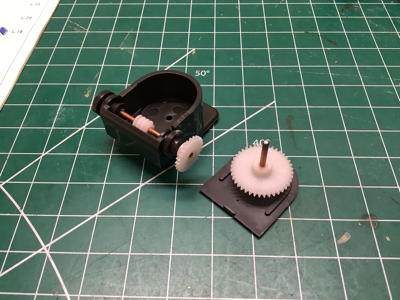
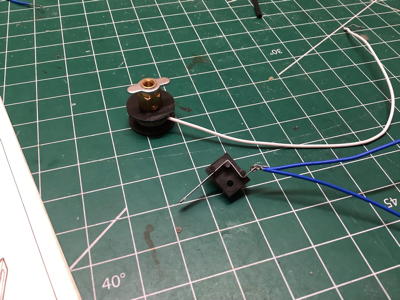
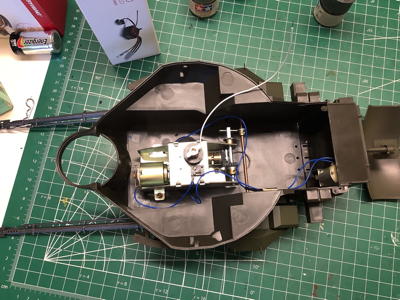
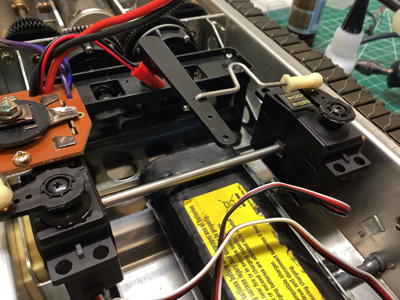
The tape for the servo driving the MSC is in shear so it worked OK, but the tape for the steering servo is in tension so it immediately pulled away from the chassis and disconnected the steering.  To solve this, I installed the metal bar shown on the left between the servos and above the main battery.  This keeps the servos spaced apart and prevents them from pulling away from the chassis.  On the right you can see the turret servo which controls a simple reversing switch.  The turret therefore has no speed control, it is either forward, off, or reverse.
   

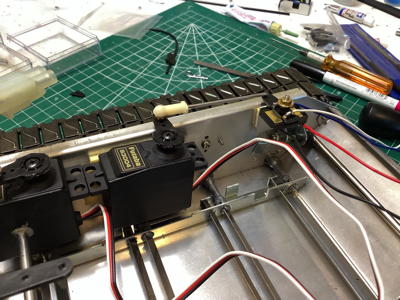
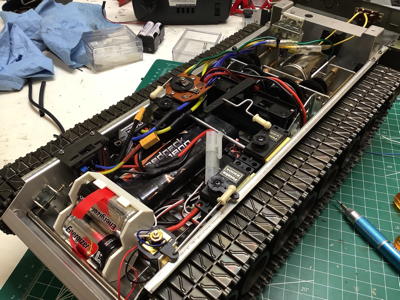
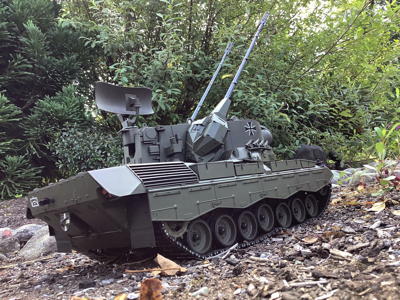
These pictures compare the stock electrical system with my upgraded system.  On the left is the stock system.  The 7.2V NiMH battery is below, and you can clearly see the other two battery packs.  On the right I've added a modern ESC to control the main drive system.  It contains a BEC and therefore can also power the radio system without the 4-AA batteries which are now eliminated.  I left the MSC and it's servo in place, but they are not wired to anything.  The servo and MSC move for nostalgic reasons only.  I considered driving the turret from the same battery, but using 7.2V instead of 3V would make it much too fast.  Instead I retained the original 2-C battery box and the mechanical switch and used it to drive the radar.  The radar doesn't really need speed control because it only ever moves at one speed, so I kept the servo driven switch.  I did separate the radar and turret traverse circuits though.  I added a 4th channel for the turret and powered it with a tiny 25A ESC so I can control the traverse speed.  The turret speed on the real Gepard is incredibly fast, so I didn't mind the extra voltage on this axis.  The final rat's nest is on the right.  The two small yellow connectors allow me to disconnect and remove the turret for hull access.
   
Attachments:
The following user(s) Liked this: stingray-63

Please Log in to join the conversation.

Blakbird's 56003 Flakpanzer Gepard Build 1 year 11 months ago #71251

This thing looks good from every angle.  I painted it only after the construction was complete.  Note the asymmetry in the hull between the exhaust on the left and storage boxes on the right.  The pictures below show the model in a number of configurations and environments.  Note that they were taken before I replaced the tracks.


Attachments:
The following user(s) Liked this: stingray-63, Ducksnuts

Please Log in to join the conversation.

Blakbird's 56003 Flakpanzer Gepard Build 1 year 11 months ago #71254

I love this tank

Please Log in to join the conversation.

Blakbird's 56003 Flakpanzer Gepard Build 1 year 11 months ago #71256

Nice build a usual :) I could be tempted in to a set of these rubber padded tacks, Can you share a link for me please :) 
If you can't fix it with a hammer, you've got an electrical problem mate :)

Please Log in to join the conversation.

Blakbird's 56003 Flakpanzer Gepard Build 1 year 11 months ago #71257

Nice build a usual :) I could be tempted in to a set of these rubber padded tacks, Can you share a link for me please :) 
 

I got them from eBay. 
www.ebay.com/it...632-2357-0
 
The following user(s) Liked this: AndyAus

Please Log in to join the conversation.

Blakbird's 56003 Flakpanzer Gepard Build 1 year 2 weeks ago #74948

My curiosity has stretched into the combat tank vehicles and I'm wondering if I should get a Tamiya kit, or some other as Tamiya seem to cost much more.

There are some nice tanks out there: 
Radiostyrda Stridsvagnar, 1:16 Metall uppgraderade (radiostyrda-modeller.se)
The following user(s) Liked this: Al

Please Log in to join the conversation.

Blakbird's 56003 Flakpanzer Gepard Build 1 year 2 weeks ago #74993

Heng Long makes some nice tanks in the same scale as Tamiya (1/16) and offers most of the same models.  I've never built one but I've heard good things about them.  Still, there is usually a good reason that Tamiya costs more.

Please Log in to join the conversation.

  • Page:
  • 1
  • 2
Moderators: caprinutstingray-63AndyAus
Time to create page: 0.253 seconds
Cookies are required to make this site work. If you continue to use this site you permit us to use cookies.