Keyword

TOPIC:

My M chassis builds 3 years 5 months ago #62799

That my type of advent calendar!

There is not a single one out there that interest me either....
I could turn one of my 6 unbuilt plastic kits into one.
The biggest is the Italeri Scania 143R Topline I had for 25 years.
The following user(s) Liked this: Jonny Retro, stingray-63, 1972 LeMansGT Jim

Please Log in to join the conversation.

My M chassis builds 3 years 5 months ago #62803

Want to share your supplier? :)

Please Log in to join the conversation.

My M chassis builds 3 years 5 months ago #62837

Sure!

Kitronik is the place :y:

There is two companies that make styrene sheets in Norway, non of them want to sell to the public.
And I found noting on ebay without stupid shipping quotes, so I had to investigate further.
Then I stumbled upon the Kitronik.
The following user(s) Liked this: Jonny Retro

Please Log in to join the conversation.

Last edit: by caprinut.

My M chassis builds 3 years 5 months ago #62846

Sure!

Kitronik is the place :y:

There is two companies that make styrene sheets in Norway, non of them want to sell to the public.
And I found noting on ebay without stupid shipping quotes, so I had to investigate further.
Then I stumbled upon the Kitronik.


Interesting ... I do like the range of colours, but it's slightly a slightly odd size, only 1mm & 1.5mm thick, and it's HIPS (with a 10% GPPS layer according to the their site).

:)

Please Log in to join the conversation.

My M chassis builds 3 years 5 months ago #62849

Yep will be intreting if they work like normal styrene.
In the past I used a styrene that had a bluish hue to it and more slippery than the rest I have gotten over the years.
Tried acetone on that and it was working, meliting, but the hold was not great.
If these are better than that, I'm good :laugh:

The biggest downside was the only sizes available, but colors made up for it.

Please Log in to join the conversation.

My M chassis builds 3 years 5 months ago #62879

Working on the engine over - some details will be easier to do now rather than later.

Curve achieved by heating with a hot air gun & forming over the edge of my desk :)


Basic shape is there, load bed is a simple platform ATM. Body mount magnets glued on with 2-part epoxy.


Grille logo (from 1962, but not completely .... and my vocabulary continues to diminish, i want to say out of time in a fancy way but just can't think of the word ... carved from 2mm sheet

Attachments:
The following user(s) Liked this: stingray-63

Please Log in to join the conversation.

My M chassis builds 3 years 5 months ago #62881

Toooopppp

Please Log in to join the conversation.

My M chassis builds 3 years 5 months ago #62883

Anachronistic, that was the word :whistle:

Please Log in to join the conversation.

Last edit: by Jonny Retro. Reason: Spelling

My M chassis builds 3 years 5 months ago #62884

That bonnet looks good.

I did the same way when making the bed for my Rod project, bending it over my workbench with help of heatgun.
The tricky bit was to get the same curve when I needed to make a new section as I cut the sides too short.

How you can make those letters are beond me, I have tested several times and failed every time.
Been working with styrene for 12 years.
My hands have less force now than before so I think some of my troubles are down to that.
Times I even struggling to hold the ruler steady as I cut along the line on a sheet.

Please Log in to join the conversation.

My M chassis builds 3 years 5 months ago #62886

That bonnet looks good.

I did the same way when making the bed for my Rod project, bending it over my workbench with help of heatgun.
The tricky bit was to get the same curve when I needed to make a new section as I cut the sides too short.

How you can make those letters are beond me, I have tested several times and failed every time.
Been working with styrene for 12 years.
My hands have less force now than before so I think some of my troubles are down to that.
Times I even struggling to hold the ruler steady as I cut along the line on a sheet.


The logo was easy - take a bit of styrene & remove everything that doesn't look like a letter ;)

Seriously though - method was to find the logo, resize & sharpen it, print (or in this case, use the plotter/cutter), stick that to the styrene, and use drills, files, dremel, scalpel & wet & dry paper to remove the bulk of it, then partially repeat when the "K" flew off into the black hole under my workbench. It's by no means perfect, the "Bombardier" text should be 2 pieces but is now 4 ("B", "omb", "ard" and "ier").

ETA - still, 2-3 hours work spread over a few sittings

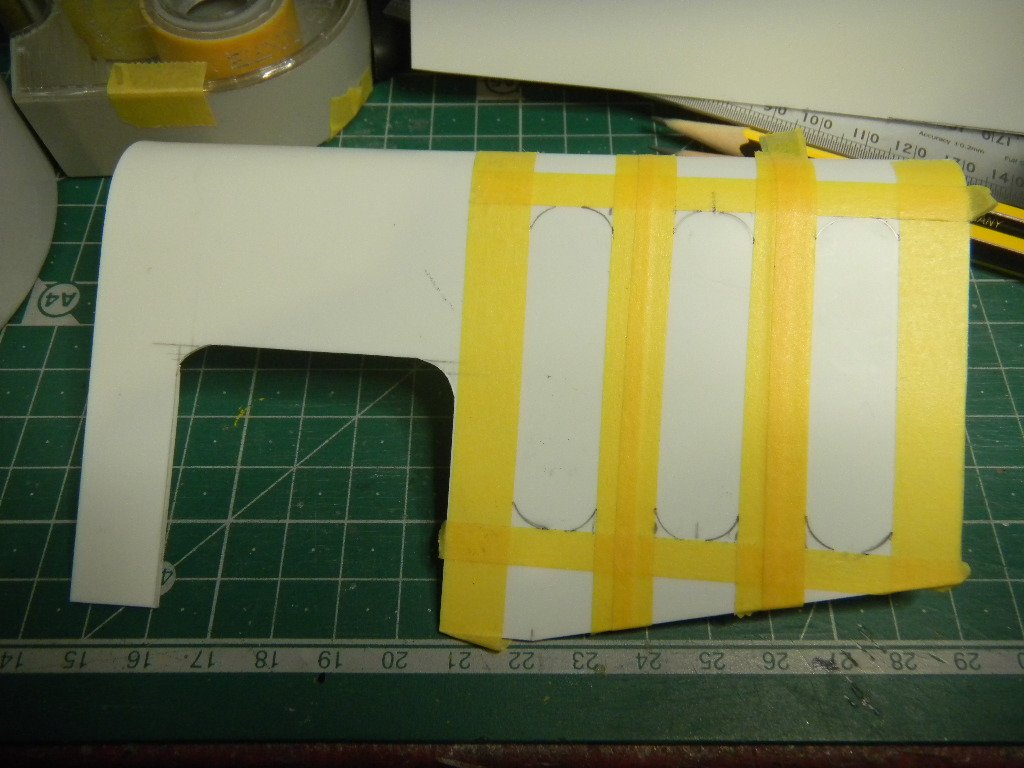
I often have problems with cutting against a straight edge, more pressure seems like it ought to help but just makes it worse when something does move - strategically placed paper or tape (between the ruler and the styrene and between the styrene and the cutting mat) really helps, as does lighter (and more) passes of the scalpel.

:)
The following user(s) Liked this: caprinut, stingray-63

Please Log in to join the conversation.

Last edit: by Jonny Retro.
Moderators: caprinutstingray-63AndyAus
Time to create page: 0.798 seconds
Cookies are required to make this site work. If you continue to use this site you permit us to use cookies.