Is that a high-beam button on the floor?
The following user(s) Liked this: stingray-63, 1972 LeMansGT Jim
|
|
Please Log in to join the conversation. |
Someone at Tamiya was either having a bad day, or just outright decided to play a cruel joke on people. . . . . . .
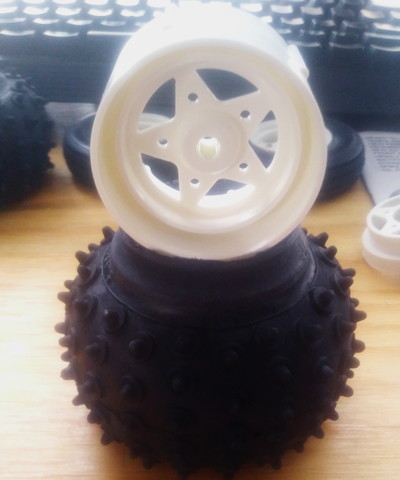
Fitting the Hornet's rear tyres on the rims is ridiculous. First one seriously took me 15mins. Finally figured out it takes lots of swearing, combined with lots of stretching and essentially "warming" the tyre. More explicit swearing at the second one, and it went on much quicker. Attachments: |
|
Please Log in to join the conversation. |
|
The following user(s) Liked this: stingray-63, Ducksnuts
|
Please Log in to join the conversation. |
Nice.
Had a foot button on my old Hillman Hunter. The original switch on the column stick died, and is was simpler for auto-electrician to wire in a foot button. To be honest, I actually found it more convenient to use. |
|
Please Log in to join the conversation. |
|
Well, if you find Hornet tires are difficult to put on the Rim, it is nothing compared to the Marui Hunter/Galaxy ones. That being said, my son built his Super Storm Dragon, just after I built the Hornet, and once you have found the trick it is not that difficult (same goes for the Marui Hunter/Galaxy tires - once you know how to proceed it takes 3 minutes, and you don't have to warm anything). I won't disclose the secret as it is an experience everyone has to endure as part of the rc journey
I buy kits to built and ru(i)n them
|
Please Log in to join the conversation.
Last edit: by silvertriple.
|
I've got very good at the "Jeremy Clarkson Method".... Swearing and more power, and if that fails hit it with a hammer!!!
The following user(s) Liked this: stingray-63
|
|
Please Log in to join the conversation. |
|
That's the thing : everyone tries to insert the internal ring while it is more about wrapping the internal ring with the tire... The way you handle it completely changes the paradigm
(and when I say it is easier with the Hornet rings, it is because there is steps you can use to ease this : there is nothing like this on the Hunter/Galaxy tires) I buy kits to built and ru(i)n them
|
Please Log in to join the conversation.
Last edit: by silvertriple.
|
|
I've never had a problem with that sort of tyre & TBH don't see how anyone else could - but perhaps it's a matter of technique? Start with wheel at 90 degree angle to tyre (as your pic, but with tyre bead in normal position) Push wheel into tyre (tyre opening gets stretched by wheel) Manipulate wheel back to correct flat orientation, make sure tyre beads are seated correctly. Time elapsed, less than 30 seconds per wheel? What am I missing? Getting all three parts of the wheel to seat in alignment & close enough together that the screws bite, sometimes that's a different matter - It's often easier to start with a couple of longer screws & replace them after. ETA - I've never read the bit of the manual on tyre fitting ...
The following user(s) Liked this: Ducksnuts
|
Please Log in to join the conversation.
Last edit: by Jonny Retro.
|
|
Just looked at a re-re Hornet manual & compared it to an old one ... I think they've recognised that some people might have trouble with it, but have just added a few somewhat unclear words to the caption, reusing the same drawing from 1984. One could interpret the caption as Tamiya intending you to rely on the low, rounded ribs on the rim gripping the bead & allowing you to torque the rim in - which I'm sure wouldn't work. Otherwise, put the rim in at 90 degrees, twist back to flat when it's in would appear to be "correct" ? |
Please Log in to join the conversation. |